How to modify DaisyUI theme using CDN

Jasser Mark Arioste

Daisy UI is usually set up using npm and is already packaged in a production CSS, for example in this tutorial on how to set it up on Next.js. However, sometimes we want a quick setup using the CDN without any dependencies. In this tutorial, I will show you how to set up DaisyUI using CDN modifying the theme.
Please do note that using cdn when importing daisyUI or tailwind is not recommended because it won't be able to pruge the css and optimize using only the css needed by the app
Project Setup #
To setup daisyUI using cdn, we only need to add tailwindcss cdn and daisyui cdn to our html
<script src="https://cdn.tailwindcss.com"></script>
<link
  href="https://cdn.jsdelivr.net/npm/daisyui@2.31.0/dist/full.css"
  rel="stylesheet"
  type="text/css"
/>123456
Now we can use all the components of daisyUI and do modifications using tailwindcss utility classes.
<body>
  <main>
    <button class="btn btn-primary rounded-full">Hello</button>
    <button class="btn btn-secondary">Hello</button>
  </main>
</body>123456
Customizing the theme in a CDN setting #
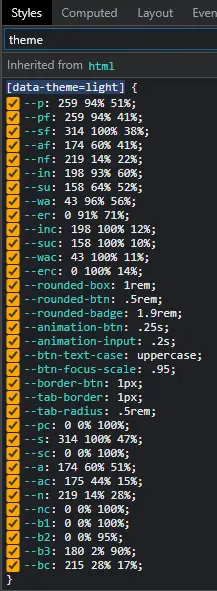
Normally, we use tailwind.config.js to customize the theme in DaisyUI. However when using a cdn, we need to write the theme using css. If we check the generated theme from DaisyUI, we find something like below on the inspect tool, DaisyUI uses css variables and hsl color model representation to represent the colors.

All these variables represent something in the daisy ui theme. If you want to modify primary color for example, you have to modify --p variable. below is a customized theme and breakdown of all the variables.
//styles.css [data-theme='mytheme'] { /* primary */ --p: 262 50% 40%; /* primary focus */ --pf: 262 80% 40%; /* primary content */ --pc: 0 0% 100%; /* secondary */ --s: 316 70% 0%; /* secondary focus */ --sf: 316 70% 100%; /* secondary content */ --sc: 0 0% 50%; /* accent */ --a: 175 70% 41%; /* accent content */ --ac: 0 0% 100%; /* accent focus */ --af: 175 70% 33%; /* info */ --in: 198 93% 60%; /* info content */ --inc: 198 100% 12%; /* success */ --su: 158 64% 52%; /* success content */ --suc: 158 100% 10%; /* warning */ --wa: 43 96% 56%; /* warning content */ --wac: 43 100% 11%; /* error */ --er: 0 91% 71%; /* error content */ --erc: 0 100% 14%; /* neutral */ --n: 218 18% 12%; /* neutral focus */ --nf: 223 17% 8%; /* neutral content */ --nc: 220 13% 69%; /* base 100 */ --b1: 220 18% 20%; /* base 200 */ --b2: 220 17% 17%; /* base 300 */ --b3: 219 18% 15%; /* base content */ --bc: 220 13% 69%; /* other settings */ --rounded-box: 1rem; --rounded-btn: 0.25rem; --rounded-badge: 1.9rem; --animation-btn: 0.25s; --animation-input: 0.2s; --btn-text-case: capitalize; --btn-focus-scale: 0.95; --border-btn: 1px; --tab-border: 1px; --tab-radius: 0.5rem; }1234567891011121314151617181920212223242526272829303132333435363738394041424344454647484950515253545556575859606162636465666768697071
If you want to use a certain hex code, you'll have to use an hex to hsl color converter.
Using the customized theme DaisyUI theme #
In order to use the customized theme, we just have to add the css and use the theme using data-theme attribute as shown below.
<!DOCTYPE html> <html lang="en"> <head> <title>Home</title> <meta charset="UTF-8" /> <meta name="viewport" content="width=device-width" /> <script src="https://cdn.tailwindcss.com"></script> <link href="https://cdn.jsdelivr.net/npm/daisyui@2.31.0/dist/full.css" rel="stylesheet" type="text/css" /> <!-- insert link here --> <link href="styles.css" rel="stylesheet" type="text/css" /> </head> <body> <div data-theme="mytheme" class="p-16"> <h1>mytheme</h1> <button class="btn btn-primary rounded-full">Hello</button> <button class="btn btn-secondary">Hello</button> </div> <div data-theme="light" class="p-16"> <h1>Light theme</h1> <button class="btn btn-primary rounded-full">Hello</button> <button class="btn btn-secondary">Hello</button> </div> </body> </html>123456789101112131415161718192021222324252627282930
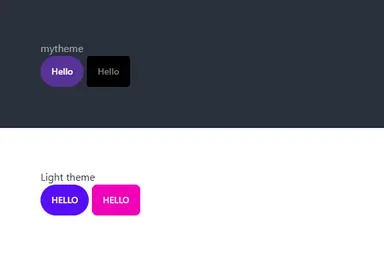
Let's will see the difference between mytheme and light theme.

Conclusion #
We have successfully setup daisyUI using CDN and also modify the theme to use in our project.
Resources #
Docs - https://daisyui.com/docs/cdn/
Code & Demo - https://stackblitz.com/edit/web-platform-xpaf5a
Credits: Image by 🌼Christel🌼 from Pixabay


