How to Set Up GraphQL URQL Client with NextJS 13 Server Components

Jasser Mark Arioste

Hello! In this tutorial, you'll learn how to set up URQL GraphQL Client with NextJS 13 and code generation with Typescript.
Introduction #
NextJS has recently released version 13.4 which marks the /app router as stable. In this version, it uses server components as the default unless you specify the "use client" directive. When I upgraded my project that uses URQL GraphQL client to Next 13 with server components, I noticed some problems arise. It's important to know how to import URQL correctly and also how to generate GraphQL queries so that the hooks are separated from the documents.
Tutorial Objectives #
These are the steps of what we'll be doing in this tutorial:
- Create a new NextJS 13 project
- Install URQL and other related dependencies
- Create GraphQL Queries and generate Typescript code
- Fetch data using URQL client with server components.
Step 0: Checking create-next-app version
#
If you already have an existing NextJS project, you can proceed to Step 2.
In this step, you'll use the create-next-app command to bootstrap a new next js project. It's important to use the latest version so first, check if you have the latest version of the create-next-app package by running the following command:
npx create-next-app --version
#or
npx create-next-app -V
It should return at least version v13.4.x on the command line. If for some reason, you have version 12.3.4, you probably installed it globally on your computer. First, uninstall globally it using the command:
npm uninstall -g create-next-app
Now, when you run npx create-next-app --version, it should display 13.4.7 or later.
Step 1: Creating a New NextJS Project #
You can skip this step if you already have created a NextJS project beforehand. Let's create a new NextJS project by running the following command:
npx create-next-app --ts --app next-js-urql-setupThe --ts option initializes the project to use typescript and the --app option sets up the project to use the /app folder instead of the /pages folder.
Step 2: Installing the Dependencies #
Next, let's install the dependencies for GraphQL. First, we install the urql and graphql packages:
cd next-js-urql-setup
yarn add urql graphql
Next, let's install the packages used to generate typescript code.
yarn add -D @graphql-codegen/cli @graphql-codegen/import-types-preset @graphql-codegen/near-operation-file-preset @graphql-codegen/typescript @graphql-codegen/typescript-operations @graphql-codegen/typescript-urql1
These packages will allow you to separate the types, operations, and React hooks in separate files. You'll see this later in the project.
Step 3: Creating GraphQL Queries #
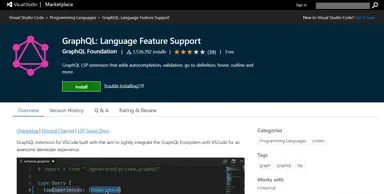
Let's create a GraphQL query using the Starwars GraphQL API. But first, let's set up our editor (VSCode) so that it can autocomplete the code when editing or creating queries. First, install the GraphQL: Language Feature Support extension of VSCode.

Click "Install" and it should guide you through the installation process.
Now for autocompletion to work, you must tell the extension where to look for the graphQL schema by creating a config file. The extension can support many different config files but in this tutorial, we'll use graphql.config.yml. Create the graphql.config.yml file in the root directory of your project.
touch graphql.config.ymlNow, inside the file, we'll specify the GraphQL schema link:
overwrite: true schema: - https://swapi-graphql.netlify.app/.netlify/functions/index12
Let's check if our extension works by creating some query operations. First, create the file graphql/films.graphql.
query AllFilms { allFilms { films { id releaseDate title } } }12345678910
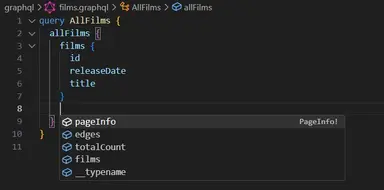
You should notice that the autocomplete is working by pressing ctrl+space / cmd+space as seen beloGrap

Step 4: Generating Typescript Code #
While it's possible to use GraphQL without Typescript, you'll have a better time if you do use Typescript since it prevents the type errors such as incorrect query variables. For this to happen we have to generate the code using graphql-codegen.
Step 4-1: Creating CodegenConfig
There are many ways to generate typescript code and it depends on your setup. What worked for me was to separate the types files, the operations files, and the hooks files from each other. For example, if you have the following GraphQL files in your codebase:
/graphql
  - films.graphql
  - vehicles.graphql12
After code generation it should have an output like this:
/graphql
  - films.graphql
  - vehicles.graphql
  - types.ts // all types from the schema
  - operations.ts // all operations used by the app
  - films.hooks.tsx // react hooks for a specific operation
  - vehicles.hooks.tsx123456
Why we separate the hooks from the operations is very important in NextJS 13. This is because you won't be able to use server components when importing react hooks. You'll have to mark it as a client-component by using "use client".
For this specific output, create a codegen.ts file t the root directory of your project.
// codegen.ts import { CodegenConfig } from "@graphql-codegen/cli"; const config: CodegenConfig = { schema: "https://swapi-graphql.netlify.app/.netlify/functions/index", documents: "graphql/**/*.graphql", generates: { // generate types.ts "graphql/types.ts": { plugins: ["typescript"] }, // generate operations.ts "graphql/operations.ts": { preset: "import-types", plugins: ["typescript-operations", "typescript-urql"], presetConfig: { typesPath: "./types", }, config: { withHooks: false, }, }, // generate hooks in separate files - optional hooks: { preset: "near-operation-file", presetConfig: { extension: ".hooks.tsx", baseTypesPath: "../types.ts", }, plugins: ["typescript-urql"], config: { withHooks: true, importOperationTypesFrom: "Operations", documentMode: "external", importDocumentNodeExternallyFrom: "./operations.tsx", }, }, }, }; export default config;123456789101112131415161718192021222324252627282930313233343536373839
In this file, we're exporting a CodegenConfig object. In this file, we're describing what files it generates and how it generates them using the generates property.
On line 7, we generate a graphql/types.ts file indicated by the key.
On lines 10-19, we generate a graphql/operations.ts file using the import-types preset. It imports the types.ts generated from before and exports the operations and the GraphQL documents. Below is an example output:
// graphql/operations.ts import * as Types from './types'; import gql from 'graphql-tag'; import * as Urql from 'urql'; export type Omit<T, K extends keyof T> = Pick<T, Exclude<keyof T, K>>; export type AllFilmsQueryVariables = Types.Exact<{ [key: string]: never; }>; export type AllFilmsQuery = { __typename?: 'Root', allFilms?: { __typename?: 'FilmsConnection', films?: Array<{ __typename?: 'Film', id: string, releaseDate?: string | null, title?: string | null } | null> | null } | null }; export const AllFilmsDocument = gql` query AllFilms { allFilms { films { id releaseDate title } } } `;1234567891011121314151617181920212223
On lines 21-34, we generate the react hooks on separate files by using the near-file-operation preset. Below is a sample of the generated output:
// graphql/films.hooks.tsx import * as Types from "./types"; import * as Operations from "./operations"; import * as Urql from "urql"; export type Omit<T, K extends keyof T> = Pick<T, Exclude<keyof T, K>>; export function useAllFilmsQuery( options?: Omit<Urql.UseQueryArgs<Operations.AllFilmsQueryVariables>, "query"> ) { return Urql.useQuery< Operations.AllFilmsQuery, Operations.AllFilmsQueryVariables >({ query: Operations.AllFilmsDocument, ...options }); }123456789101112131415
For more information on the preset and plugins, you may refer to the documentation.
Step 4-2: Modifying package.json
Next, modify package.json by adding a script to generate the typescript files. Specify codegen.ts as the config file.
{
  "name": "next-13-urql-graphql-setup-tutorial",
  "version": "0.1.0",
  "private": true,
  "scripts": {
    "dev": "next dev",
    "build": "next build",
    "start": "next start",
    "lint": "next lint",
    "generate-graphql": "graphql-codegen --config codegen.ts"
  },
  ...
}12345678910111213
Now, you can run yarn generate-graphql and it should generate the code.
Step 5: Fetching Data using URQL Client #
In this step, we'll create a URQL client and use that to fetch data from the server.
First, create the file lib/urql.ts and copy the code below:
// lib/urql.ts import { Client, cacheExchange, createClient, fetchExchange } from "urql/core"; let _client: Client | null = null; export const getUrqlClient = () => { if (!_client) { _client = createClient({ url: "https://swapi-graphql.netlify.app/.netlify/functions/index", requestPolicy: "cache-and-network", exchanges: [cacheExchange, fetchExchange], }); } const client = _client; return { client }; };12345678910111213141516
You can now fetch data in your app folder using server components for example.
// app/page.tsx import { AllFilmsDocument, AllFilmsQuery, AllFilmsQueryVariables, } from "@/graphql/operations"; import { getUrqlClient } from "@/lib/urql"; async function getAllFilms() { const { client } = getUrqlClient(); const result = await client.query<AllFilmsQuery, AllFilmsQueryVariables>( AllFilmsDocument, {} ); return result; } export default async function Home() { const { data, error } = await getAllFilms(); return ( <div> {error && <p>{error.message}</p>} {data && <pre>{JSON.stringify(data, null, 4)}</pre>} </div> ); }123456789101112131415161718192021222324252627
Explanation:
On line 9, we create a wrapper function getAllFilms. This function uses the URQL client's query() function. We import the necessary types and the AllFilmsDocument document from the @/graphql/operations module. Since the react hooks are in separate files, there's no error when importing the AllFilmsDocument and we don't have to mark the component with "use client".
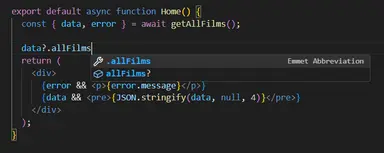
Since the result is typed using generic parameters, code autocompletion still works as expected:

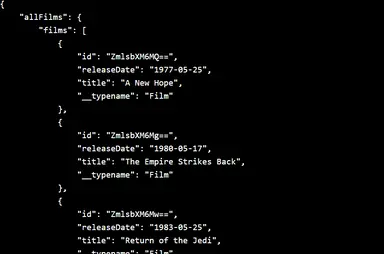
Below is the output:

That's basically it!
Full Code and Demo #
The full code is available on Github: jmarioste/next-13-urql-graphql-setup-tutorial. The Demo is available on Stackblitz: Next 13 Urql Graphql Setup Tutorial.
Conclusion #
You learned how to set up the URQL GraphQL client inside a Next 13 project including code generation and autocompletion.
If you like this tutorial, please leave a like or share this article. For future tutorials like this, please subscribe to our newsletter or follow me on GitHub.
Credits: Image by Devraj Bajgain from Pixabay


