How to: Form Validation in ReactJS Functional Component

Jasser Mark Arioste

Hello, hustlers! In this tutorial, you'll learn how to implement form validation in a react functional component. We'll also use typescript throughout this tutorial.
What are the Methods of Form Validation? #
There are two main validation methods: client-side validation and server-side validation.
Client-side validation is where you validate the form in the browser and show error messages if any before submitting it to the server. You usually use a form-state management library like formik or react-hook-form, along with a schema validation library like Yup, Zod, and many others.
Server-side validation is where you submit the form to the server with maybe very minimal validation in the browser. If there's any invalid field, the server will return an error message for each field. The main advantage of server-side validation is that you don't have to import libraries to the client.
What Type of Validation will we Implement? #
In this tutorial, we'll implement client-side validation using formik and yup. Both libraries are really popular in terms of client-side form validation.
Final Output #
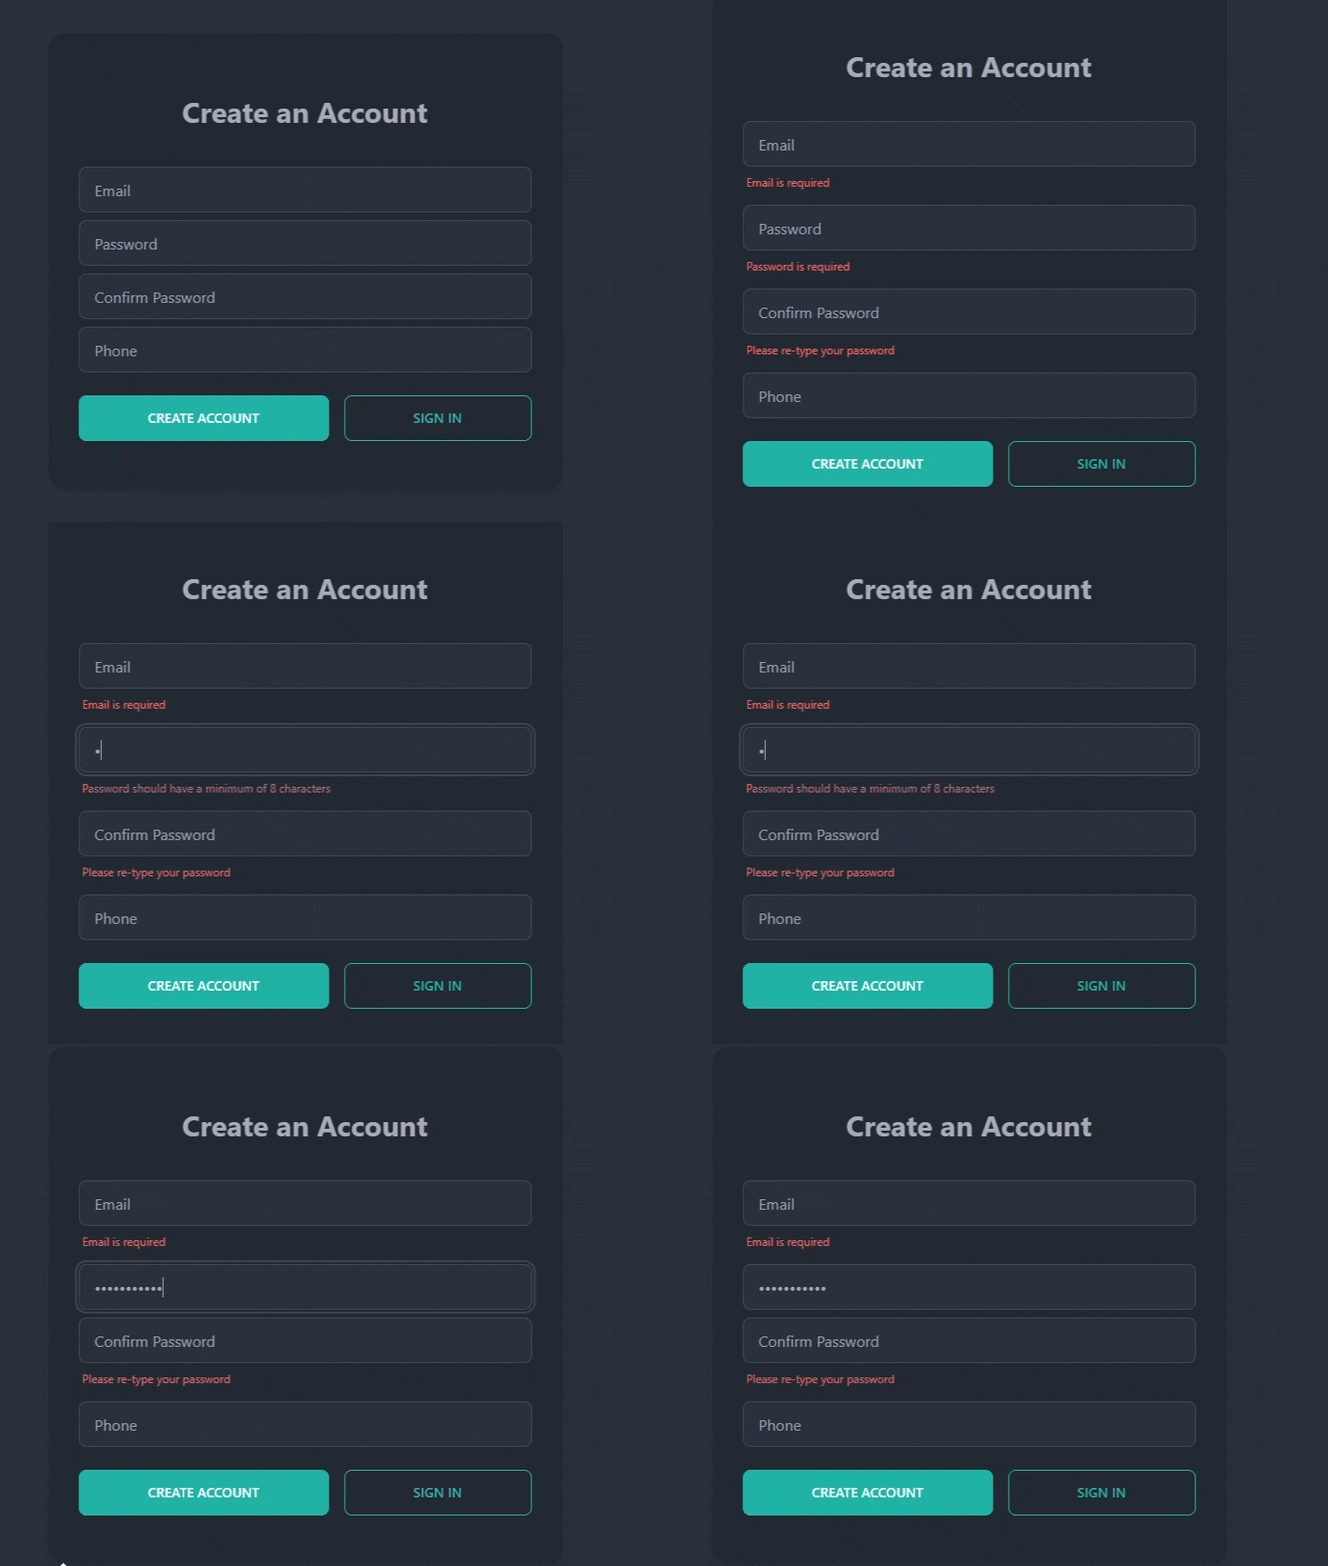
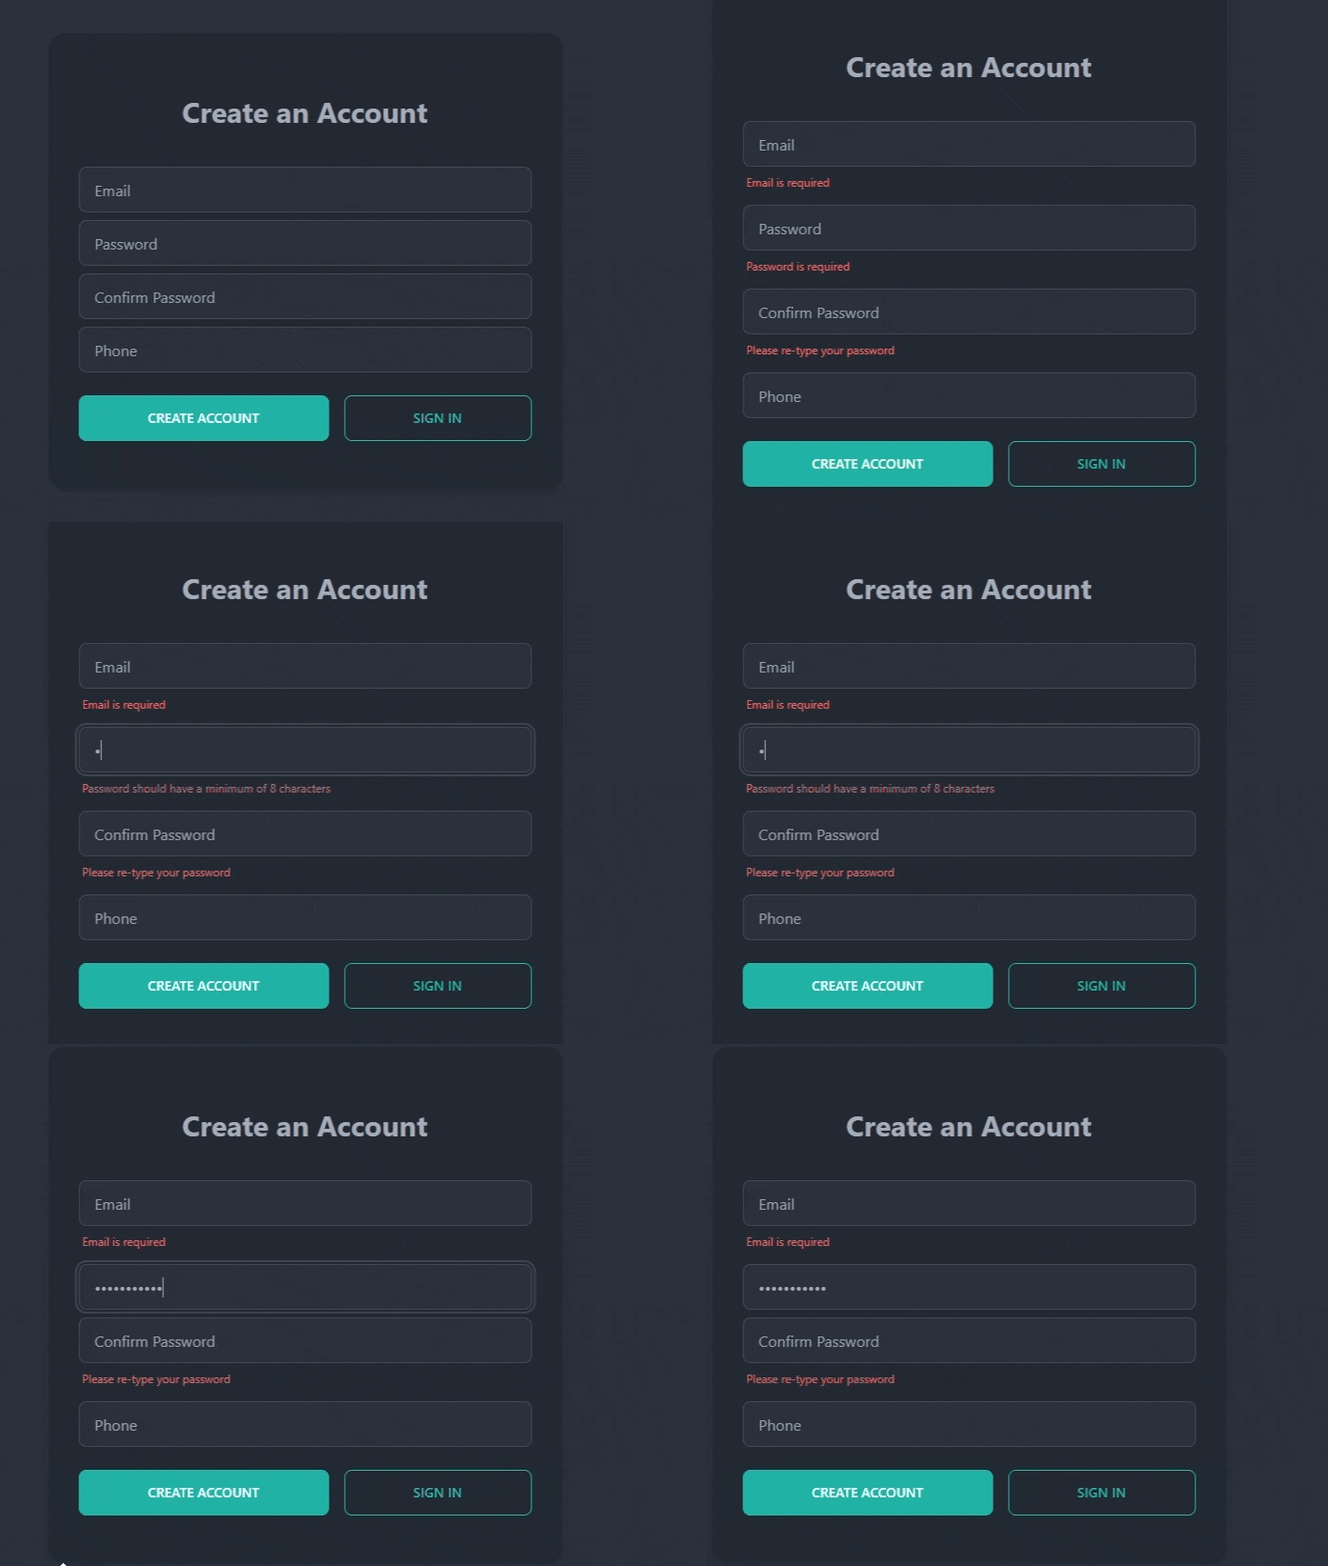
We're going to make a simple registration form with client-side validation. Here's the final output of what we'll be making today.

Step 0 - Project Setup (Optional) #
For this tutorial, we're going to use NextJS as our react framework and DaisyUI and TailwindCSS for styling. If you are using another react framework (like create-react-app), that's fine. This tutorial is not framework-dependent so you can choose any framework that you like.
However, If you would like to follow along from scratch, you can simply run the following command to create a new NextJS project:
npx create-next-app -e https://github.com/jmarioste/next-daisyui-starter-plain react-form-validation
Once everything is installed, you can run the following command to start the local dev server:
cd react-form-validation && yarn devStep 1 - Installing Formik and Yup #
Let's install the main dependencies for form validation using the command:
#yarn
yarn add formik yup

#npm
npm i formik yup
Step 2 - Creating a Form with Formik #
In this step, we will create a simple registration form with Formik. This won't contain any validation yet.
First, create the file components/RegistrationForm.tsx. We'll create a react functional component that uses formik to manage the state.
After that, copy the code below. I've added comments to explain the code so make sure you don't skip them!
// components/RegistrationForm.tsx import { Formik, Form, Field } from "formik"; import Link from "next/link"; const RegistrationForm = () => { const initialValues = { email: "", password: "", confirmPassword: "", phone: "", }; // Formik onSubmit handler const handleSubmit = (values: typeof initialValues) => { console.log(values); }; return ( /* Line 20: We wrap the form with a <Formik/> provider to define the form context <Formik/> will take care of all the state for each field and the form itself. it gives error, touched, value states to each field: e.g., username.error, username.value, username.touched it also provides us with isSubmitting and dirty states */ <Formik initialValues={initialValues} onSubmit={handleSubmit}> {/* Line 23: We use <Form/> component instead of tag <form/> tag since it will call e.preventDefault() when we submit the form. */} <Form className="card shadow-lg bg-base-200 "> <div className="card-body"> <h1 className="text-3xl font-bold my-8 text-center"> Create an Account </h1> <div className="flex flex-col gap-2"> {/* Formik exports a component called Field. We use this instead of default the <input/> tag for simple input components. VERY Important: The "name" prop should match the keys of "initialValues". This way, Formik will be able to create the state for each field. */} <Field name="email" placeholder="Email" className="input input-bordered" /> <Field name="password" placeholder="Password" type="password" className="input input-bordered" /> <Field name="confirmPassword" placeholder="Confirm Password" type="password" className="input input-bordered" /> <Field name="phone" placeholder="Phone" className="input input-bordered" /> </div> <div className="flex justify-between gap-4 my-4"> {/* Very important to have type="submit" to trigger the Formik's onSubmit callback */} <button className="btn btn-accent flex-grow" type="submit"> Create Account </button> <Link href="/sign-in" className="btn btn-accent btn-outline flex-grow" > Sign In </Link> </div> </div> </Form> </Formik> ); }; export default RegistrationForm;1234567891011121314151617181920212223242526272829303132333435363738394041424344454647484950515253545556575859606162636465666768697071727374757677
Next, we have to use this component somewhere. Go to the pages/index.tsx file and copy the code below:
// pages/index.tsx import type { NextPage } from "next"; import RegistrationForm from "../components/RegistrationForm"; const Home: NextPage = () => { return ( <div className="container mx-auto"> <div className="h-screen grid place-content-center"> <div className="w-full lg:w-[540px]"> <RegistrationForm /> </div> </div> </div> ); }; export default Home;1234567891011121314151617
If you go to localhost:3000/ you should get the following result:

Try to input all the fields on the form and click the "Create account" button. Notice that in the console, Formik already takes care of mapping all the values with our initial fields:
# Browser console
{email: 'jasser@reacthustle.com', password: 'helloworld', confirmPassword: 'helloworld', phone: '1234567890'}1
Step 3 - Creating a Schema with Yup #
Next, we'll create a validation schema using Yup. A validation schema defines the rules on how our fields should be validated. For example, the email field should be required (not empty) and should have an email validation. pattern.
All right first let's define how our fields should be validated:
- email - This field should be a string, is required, and should be an email.
- password - Should be a string, and should have a minimum of 8 characters. It should also contain 1 uppercase, 1 lowercase, and 1 number.
- confirmPassword - should have the same value as the password.
- phone - should be a string and is optional.
To implement these validation requirements, modify components/RegistrationForm.tsx and add this bit of code:
// components/RegistrationForm.tsx import { Formik, Form, Field } from "formik"; import Link from "next/link"; import { object, string, ref } from "yup"; const registrationSchema = object({ email: string() .required("Email is required") .email("Please enter a valid email"), password: string() .required("Password is required") .min(8, "Password should have a minimum of 8 characters") .matches(/[A-Z]/, "It should contain at least 1 uppercase character") .matches(/[a-z]/, "It should contain at least 1 lowercase character") .matches(/[1-9]/, "It should contain at least 1 digit"), confirmPassword: string() .required("Please re-type your password") .oneOf([ref("password")], "Password does not match"), phone: string().optional(), }); const RegistrationForm = () => { // ... omitted for brevity }12345678910111213141516171819202122
Yup has a really good API to simplify the implementation of all these validation requirements. We use the object() function to create a schema and we describe each field using Yup's prebuilt API based on our requirements. I won't go into detail with this, but if you read the code, I think it's pretty self-explanatory.
Step 4 - Integrating Yup with Formik #
Formik has really good integration with Yup, all we have to do is to set the validationSchema prop of the <Formik/> component.
// components/RegistrationForm.tsx
// ...
const RegistrationForm = () => {
  // ...
  return (
    <Formik
      initialValues={initialValues}
      onSubmit={handleSubmit}
      validationSchema={registrationSchema}
    >
    ...
    </Formik>
  )
}1234567891011121314
Step 5 - Adding Error Messages (Final Step) #
After setting the validationSchema prop, you'll notice that nothing happens when you click "Create account" and it doesn't log to the console. This is because there are validation errors in the form. We first have to show them for each field.
To do this, we'll do a bit of refactoring and create a wrapper for Formik's <Field/> component. First, create the file components/CustomField.tsx.
// components/CustomField.tsx import { Field, FieldAttributes, useField } from "formik"; const CustomField = <V extends unknown>(props: FieldAttributes<V>) => { // useField hook is a useful hook to get access to the field's states when using custom components. // The meta object contains error, touched states for the specific field const [field, meta] = useField(props.name); return ( <div className="form-control"> <Field {...props} className="input input-bordered" /> {/* display the field has error and was already touched */} {meta.error && meta.touched && ( <label className="label"> <span className="label-text-alt text-error">{meta.error}</span> </label> )} </div> ); }; export default CustomField;1234567891011121314151617181920
Now, let's use this component in our <RegistrationForm/>:
// components/RegistrationForm.tsx
import CustomField from "./CustomField";
...
const RegistrationForm = () => {
  const initialValues = {
    email: "",
    password: "",
    confirmPassword: "",
    phone: "",
  };
  // Formik onSubmit handler
  const handleSubmit = (values: typeof initialValues) => {
    console.log(values);
  };
  return (
    <Formik
      initialValues={initialValues}
      onSubmit={handleSubmit}
      validationSchema={registrationSchema}
    >
      <Form className="card shadow-lg bg-base-200 ">
        <div className="card-body">
          <h1 className="text-3xl font-bold my-8 text-center">
            Create an Account
          </h1>
          <div className="flex flex-col gap-2">
            <CustomField name="email" placeholder="Email" />
            <CustomField
              name="password"
              placeholder="Password"
              type="password"
            />
            <CustomField
              name="confirmPassword"
              placeholder="Confirm Password"
              type="password"
            />
            <CustomField name="phone" placeholder="Phone" />
          </div>
          <div className="flex justify-between gap-4 my-4">
            {/* Very important to have type="submit" to trigger the Formik's onSubmit callback */}
            <button className="btn btn-accent flex-grow" type="submit">
              Create Account
            </button>
            <Link
              href="/sign-in"
              className="btn btn-accent btn-outline flex-grow"
            >
              Sign In
            </Link>
          </div>
        </div>
      </Form>
    </Formik>
  );
};
export default RegistrationForm;123456789101112131415161718192021222324252627282930313233343536373839404142434445464748495051525354555657
After this step, you'll notice that our form now displays error messages:

That's basically it.
Full Code and Demo #
The full code and demo are available on Stackblitz: Form Validation on React Functional Component.
Conclusion #
you learned how to implement form validation in a react functional component using Formik and Yup. Both these libraries are awesome on their own but they become more awesome when used together. They really simplify the process of implementing complicated forms in react.
I'd like to thank you for reaching this far. I really enjoyed making this tutorial, I hope you enjoyed this as much as I did making it.
Resources #
We only barely scratched the surface of using both of these libraries. For more information, make sure you check out their documentation.
Credits: Image by cwiela from Pixabay


