How to Create a React onChange Event Handler in Typescript

Jasser Mark Arioste

Hello! In this tutorial, you'll learn how to create React onChange event handlers in Typescript.
Introduction #
If you're a beginner in React, you might be having trouble creating a onChange or onSubmit event for basic HTML elements or sometimes in UI Components like MUI or Chakra UI.
For example, below we have an onChange event handler using an anonymous function:
import { useState } from "react";

export default function Component() {
  const [input, setInput] = useState("");
  return (
    <div>
      <input
        onChange={(e) => {
          setInput(e.target.value);
        }}
      />
      {input}
    </div>
  );
}123456789101112131415
However, when you refactor and assign the onChange event handler to a constant. a type error occurs:
import { useState } from "react"; export default function Component() { const [input, setInput] = useState(""); const handleChange = (e) => { // Parameter 'e' implicitly has an 'any' type. setInput(e.target.value); }; return ( <div> <input onChange={handleChange} /> {input} </div> ); }1234567891011121314
In this tutorial, you'll learn a foolproof way to avoid type errors when creating onChange callback handlers by using the power of your editor.
Tutorial Objectives #
- Learn how to create an onChange handler using an anonymous arrow function
- Learn how to create a separate onChange event handler defined through a constant
- Learn how to use the VSCode editor to create the callback function
- Using the Typescript Explicit Types plugin
Technologies Used #
I assume you're using the following technologies.
- Typescript
- React
- VSCode editor
Defining onChange event using an arrow function
#
This is the most basic, common, and fastest way to create event callbacks. But it's also the least readable and maintainable. Ideally, you avoid using this approach if possible. Another downside is that you won't be able to reuse the onChange event for other elements if needed.
import { useState } from "react"; export default function Component() { const [input, setInput] = useState(""); return ( <div> <input onChange={(e) => { setInput(e.target.value); }} /> {input} </div> ); }123456789101112131415
Using ChangeEventHandler<HTMLInputElement>
#
Another way to define the onChange event is to use the ChangeEventHandler type. We can remove the type error in the first example by assigning a type to the handleChange function.
import { ChangeEventHandler, useState } from "react"; export default function Component() { const [input, setInput] = useState(""); const handleChange: ChangeEventHandler<HTMLInputElement> = (e) => { //no more errors setInput(e.target.value); }; return ( <div> <input onChange={handleChange} /> {input} </div> ); }1234567891011121314
Here we attach the type to the handleChange function. What this does is it automatically provides the type ChangeEvent<HTMLInputElement> to the e argument so it's no longer an any type.
When you hover over the e argument in your VSCode editor, it will have a type of ChangeEvent<HTMLInputElement>.

This approach is not commonly used compared to the next one.
Using ChangeEvent<HTMLInputElement>
#
Another way to declare the onChange event is to provide type to the e argument.
import { ChangeEvent, useState } from "react"; export default function Component() { const [input, setInput] = useState(""); const handleChange = (e: ChangeEvent<HTMLInputElement>) => { setInput(e.target.value); }; return ( <div> <input onChange={handleChange} /> {input} </div> ); }1234567891011121314
This approach is straightforward that you explicitly provide the type to the e argument.
If you provide the wrong type, it will result in a type error. For example:
import { ChangeEvent, useState } from "react"; export default function Component() { const [input, setInput] = useState(""); const handleChange = (e: ChangeEvent<HTMLSelectElement>) => { setInput(e.target.value); }; return ( <div> {/* TypeError: Types of parameters 'e' and 'event' are incompatible. Type 'ChangeEvent<HTMLInputElement>' is not assignable to type 'ChangeEvent<HTMLSelectElement>'.*/} <input onChange={handleChange} /> {input} </div> ); }12345678910111213141516
Using Type Inference to Determine the Type #
To determine the type of the onChange event handler or its e argument, you can use the type inference feature of VScode. First, define the onChange event using the anonymous arrow function method.
import { ChangeEvent, useState } from "react";

export default function Component() {
  const [input, setInput] = useState("");

  return (
    <div>
      <input onChange={(e)=>{}} />
      {input}
    </div>
  );
}123456789101112
Hover over the e argument. This will show (parameter) e: ChangeEvent<HTMLInputElement>

Next, refactor and create a named constant event handler using the type from Step 2.
import { ChangeEvent, useState } from "react"; export default function Component() { const [input, setInput] = useState(""); const handleChange = (e: ChangeEvent<HTMLInputElement>) => { setInput(e.target.value); }; return ( <div> <input onChange={handleChange} /> {input} </div> ); }1234567891011121314
Using the Typescript Explicit Types Plugin #
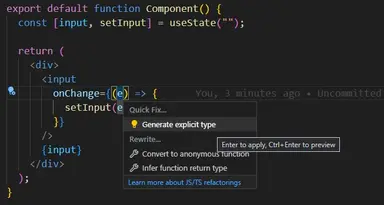
One very useful extension in VScode is the "Typescript Explicit Types" plugin. It provides a "Quick fix.." to automatically add the explicit type to whatever the type inference of a variable.
First, you set your cursor to the e argument. Then type CTRL + . or CMD + . to show the "Quick fix..." options. Below is a screenshot of how to use the plugin

After hitting the ENTER key, it would generate the code below:
import { ChangeEvent, useState } from "react";

export default function Component() {
  const [input, setInput] = useState("");

  return (
    <div>
      <input
        onChange={(e: ChangeEvent<HTMLInputElement>) => {
          setInput(e.target.value);
        }}
      />
      {input}
    </div>
  );
}12345678910111213141516
Now, you can easily refactor it to a named constant or use the refactoring feature of VScode.
Conclusion #
You learned how to declare the React onChange event handler manually and use tools to speed up coding while avoiding errors. The Typescript Explicit Types plugin is very useful in doing this.
If you like this tutorial, please leave a like or share this article. For future tutorials like this, please subscribe to our newsletter or follow me on GitHub.
Credits: Image by Veronika Andrews from Pixabay


