How to Create A React Searchable Table with MUI

Jasser Mark Arioste

Hello! In this tutorial, you'll learn how to create a searchable table in React using MUI components and implementing a custom backend search logic.
Introduction #
A search feature is always a useful feature in many applications. It allows the user to save time by immediately finding the data they want. Sometimes, we'll be tasked with implementing a search feature for a list, table, or page.
We're going to use NextJS as our react framework so that we can easily create the backend logic to display the data. For tutorial purposes, we're also going to use https://dummyjson.com/ for fetching our data.
For the front-end, since MUI has awesome built-in components such as TextField and Table, you'll be able to implement this feature fairly quickly.
Step 1: Project Setup #
First, let's create a new NextJS project by invoking the following command:
npx create-next-app@latest --ts --app react-search-table-tutorialThis will create a new NextJS app with typescript using the new /app directory. After that's done, you can start the local development server by running the command:
cd react-search-table-tutorial
yarn dev
# or
npm run dev
Step 2: Creating the Custom Backend Logic #
Next, let's first create the custom backend logic. Let's assume that you are going to implement a table for users. Create the file /app/users/route.ts and copy the following code:
// app/users.route.ts import { NextResponse } from "next/server"; export type User = { id: number; firstName: string; lastName: string; maidenName: string; age: number; gender: string; email: string; phone: string; username: string; password: string; birthDate: string; }; type DummyJSONResponse = { users: User[]; }; /** * A proxy for https://dummyjson.com to simulate calls to database * @param request * @returns */ export async function GET(request: Request) { const url = new URL(request.url); const params = url.searchParams; // select the properties that we need params.append( "select", "id,firstName,lastName,maidenName,age,gender,email,phone,username,password,birthDate" ); // use different a base url if there's a search query const hasSearch = params.has("search"); let baseUrl = `https://dummyjson.com/users`; if (hasSearch) { params.append("q", params.get("search")!); params.delete("search"); baseUrl = `https://dummyjson.com/users/search`; } const dummyUrl = new URL(baseUrl); //copy all the search params to dummyURL params.forEach((val, key) => { dummyUrl.searchParams.append(key, val); }); const response = await fetch(dummyUrl); //return the response const data = (await response.json()) as DummyJSONResponse; return NextResponse.json(data.users); }12345678910111213141516171819202122232425262728293031323334353637383940414243444546474849505152535455565758
Explanation:
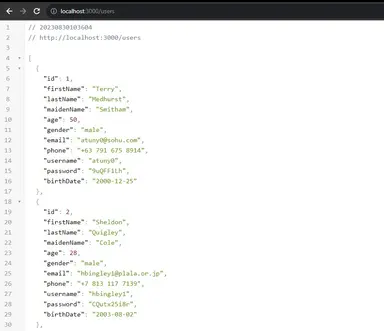
This fetches data from dummyjson.com REST API. First, we parse the query and reconstruct it before calling dummyjson.com's REST API. To test this, you can go to the route http://localhost:3000/users and it will give you a similar result below.

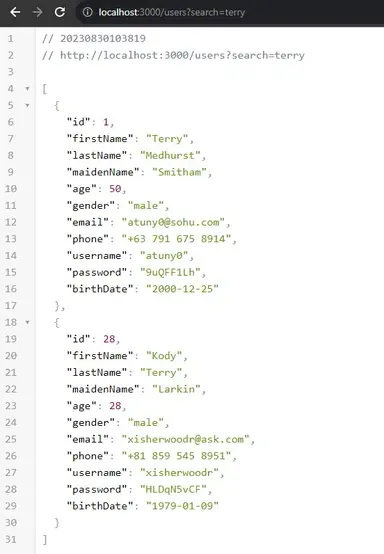
Now if you add a query parameter, for example http://localhost:3000/users?search=terry, It should give you filtered results like so:

Now that we have the search logic working in the backend, all that's left is to display the data in the front end and create a search input component!
Step 3: Installing MUI #
To Implement components quickly, we're going to use MUI. MUI is one of the most popular react libraries and it provides react components that are easy to use and well-documented.
Let's install MUI in our NextJS project by running the command:
yarn add @mui/material @emotion/react @emotion/styledOptionally, you can also install MUI icons:
yarn add @mui/icons-materialFor a more in-depth explanation of the installation, you can go to the MUI installation docs.
Step 4: Installing additional Useful Libraries #
In this tutorial, we're not going to use Next 13's SSR feature. Instead, we're going to do it the old-fashioned way by fetching data from the client. When fetching data from the client I'd like to use the useFetch hook from usehooks-ts library so let's install that.
yarn add usehooks-tsStep 5: Creating The UsersTable Component
#
Next is to create the component, first let's create the file components/UsersTable.tsx.
// components/UsersTable.tsx "use client"; const UsersTable = () => { return <div>UsersTable</div>; }; export default UsersTable;123456
Now, let's modify the file 'app/page.tsx' to use the <UsersTable/> component:
// app/page.tsx import UsersTable from "@/components/UsersTable"; export default function Home() { return ( <main> <UsersTable /> </main> ); }12345678910
Now, when you go to localhost:3000, you should see the following output:

Step 6: Fetching and Displaying Data #
Next, you're going to fetch and display data from the backend. Modify your UsersTable.tsx file to the following code:
"use client"; import { User } from "@/app/users/route"; import { Table, TableBody, TableCell, TableHead, TableRow, } from "@mui/material"; import { useFetch } from "usehooks-ts"; const UsersTable = () => { const { data } = useFetch<User[]>("/users"); return ( <div> <Table> <TableHead> <TableCell>ID</TableCell> <TableCell>Email</TableCell> <TableCell>Username</TableCell> <TableCell>First name</TableCell> <TableCell>Last name</TableCell> <TableCell>Gender</TableCell> <TableCell>Phone</TableCell> </TableHead> <TableBody> {data?.map((user) => { return ( <TableRow key={user.id}> <TableCell>{user.id}</TableCell> <TableCell>{user.email}</TableCell> <TableCell>{user.username}</TableCell> <TableCell>{user.firstName}</TableCell> <TableCell>{user.lastName}</TableCell> <TableCell>{user.gender}</TableCell> <TableCell>{user.phone}</TableCell> </TableRow> ); })} </TableBody> </Table> </div> ); }; export default UsersTable;12345678910111213141516171819202122232425262728293031323334353637383940414243444546
Explanation:
First, we use the useFetch() hook to fetch data from our previously created route /users. Next, we use MUI Table components to display the data.
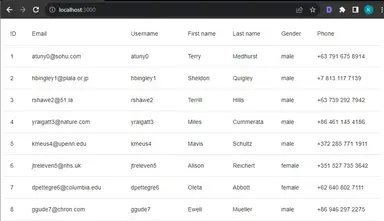
After this step, you should get the following result:

Step 7: Adding Search Functionality #
In this step, we're going to implement the search functionality.
First, add a state to hold the search input using the useState hook and modify the URL to include the search parameter if there's a value. To prevent multiple calls to the /users route, let's add a denounced state using the useDebounce hook.
// components/UsersTable.tsx
const UsersTable = () => {
  const [search, setSearch] = useState("")
  const debouncedValue = useDebounce(search, 600);
  const url = debouncedValue ? "/users?search=" + debouncedValue : "/users";

  const { data } = useFetch<User[]>(url);
 //...
}123456789
Next, add a <TextField/> component to modify the search state.
// components/UsersTable.tsx
const UsersTable = ()=> {
  //...
   return (
    <div>
      <TextField value={search} onChange={(e) => setSearch(e.target.value)} />
      // ...
    </div>
  )
}12345678910
That's basically it! You've implemented a table with search functionality with MUI components. Below is the output:

Full Code and Demo #
The full code can be accessed on Github: jmarioste/react-search-table-tutorial. The demo can be accessed at Stackblitz: React Search Table Tutorial
Conclusion #
You learned how to implement a basic react table with search functionality with ease. First, we created a backend API that allows us to search the data. Next, we implemented the frontend to display and interact with the data.
If you like this tutorial, please leave a like or share this article. For future tutorials like this, please subscribe to our newsletter or follow me on GitHub.
Resources #
If you need more information about the framework, and libraries used in this tutorial, please refer to their respective documentation.
Credits: Image by wal_172619 from Pixabay


