How to Create React Table with Sticky Columns using TailwindCSS

Jasser Mark Arioste

Hello, hustlers! In this tutorial, you'll learn how to create a react table with sticky columns using TailwindCSS.
Tutorial Objectives #
Here are our tutorial objectives for today. We're going from simple and work our way up to complicated tables.
- Create a table with 1 sticky column with no logic, just pure JSX and TailwindCSS classes.
- Create a table with 2 sticky columns with no logic, just pure JSX and TailwindCSS classes.
- Create a table where you can control which columns will be stickied to the left. Here, we'll be using
@tanstack/react-table package.
Final Output #
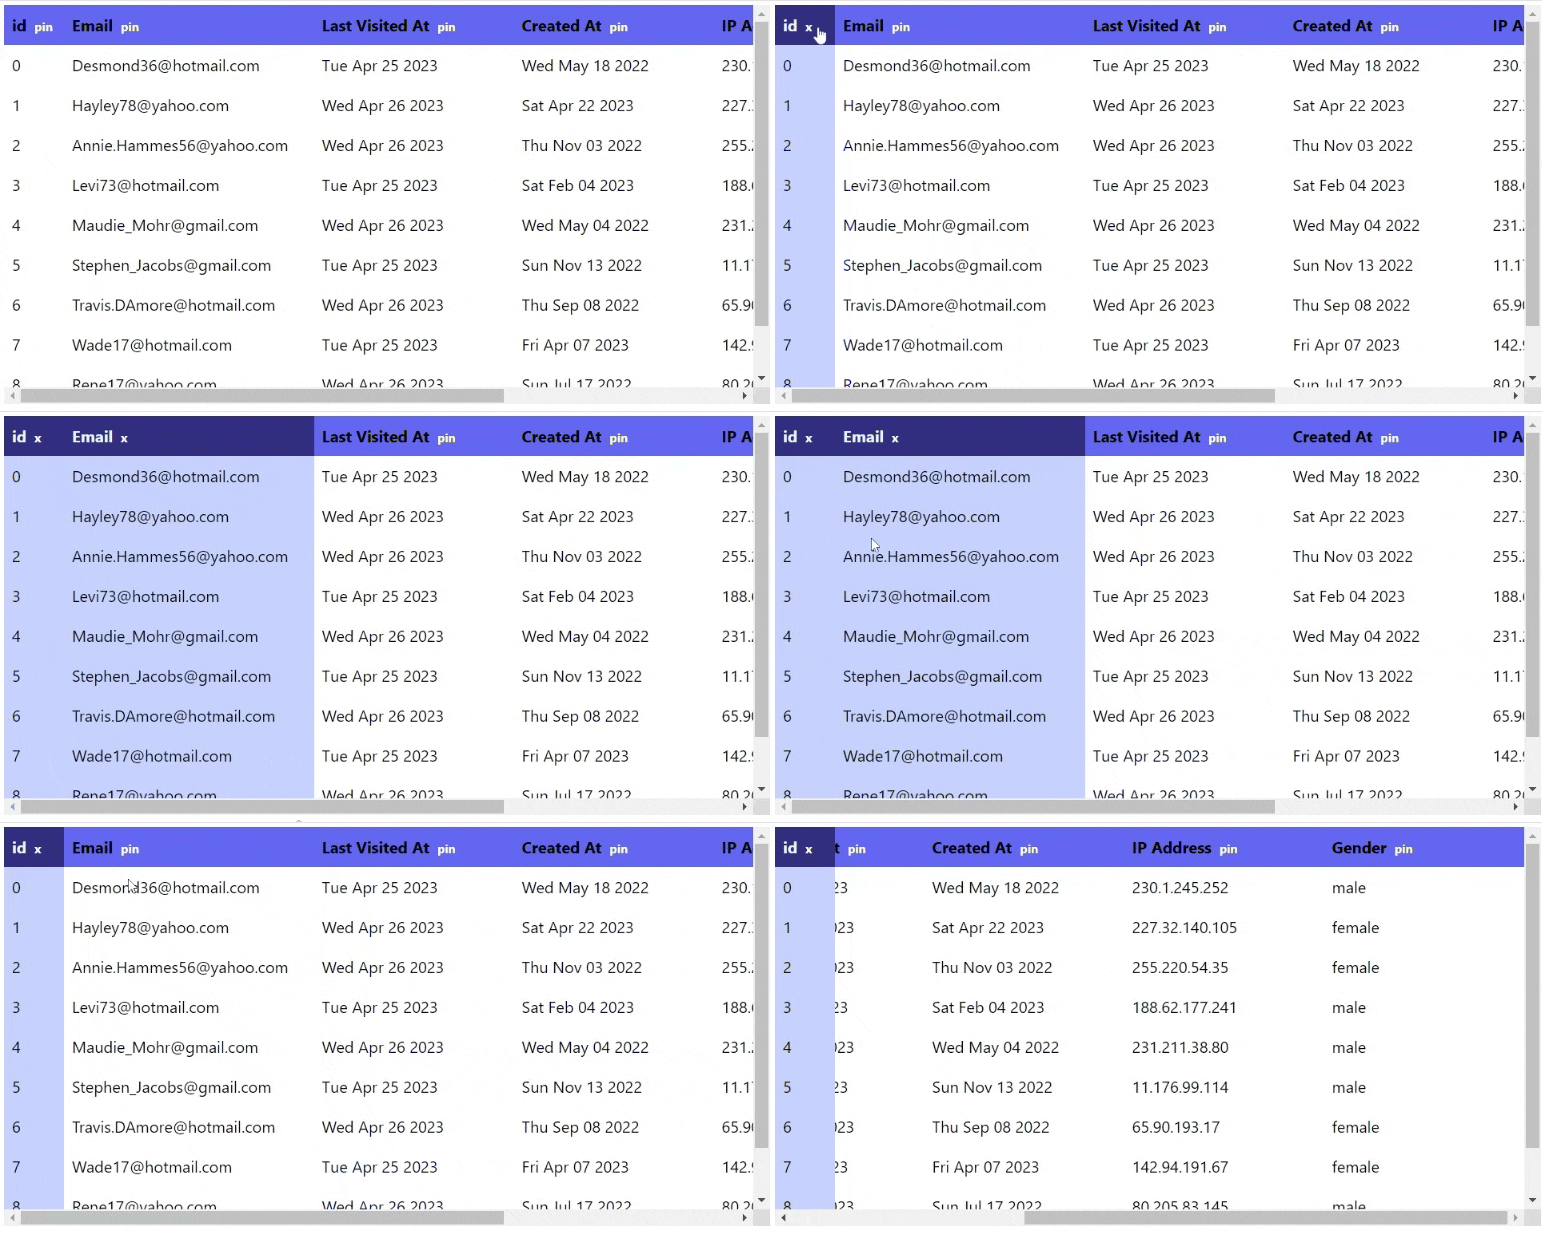
By the end of this tutorial, you'll be able to create an amazing dynamic table with sticky columns.

Prerequisites #
In this tutorial, I assume you have a basic knowledge of React and Tailwind CSS. TailwindCSS should also be installed in your project. I won't cover its installation in this tutorial.
Easy - Table with 1 Sticky Column #
To create a sticky column, you have to remember these three tips. These are the basic things you have to remember when creating sticky table columns. It can be applied to advanced implementations.
- use classes
stickyand`left-*`on<th/>and<td/>elements. sticky doesn't work on<thead/>or<tr/>elements. - It also helps to use
table-fixedon the<table>element to easily set the width for each column. - Set the
background-colorfor the stickied column. Otherwise, it will overlap with other columns because the default background is transparent.
Here's an example:
import React from "react"; const Table = () => { // array to populate rows const arr = new Array(10).fill("x"); return ( <div className="overflow-auto"> <table className="table-fixed w-full"> <thead> <tr className="text-left"> <th className="w-10 p-2 sticky left-0 bg-indigo-900 text-white"> ID </th> <th className="w-40 p-2 bg-indigo-500">Column 2</th> <th className="w-96 p-2 bg-indigo-500">Column 3</th> <th className="w-96 p-2 bg-indigo-500">Column 4</th> </tr> </thead> <tbody> {arr.map((item, index) => { return ( <tr key={index} className="text-left"> <td className="w-10 p-2 sticky left-0 bg-indigo-200"> {index} </td> <td className="w-40 p-2">Data</td> <td className="w-96 p-2">Data</td> <td className="w-96 p-2">Data</td> </tr> ); })} </tbody> </table> </div> ); }; export default Table;1234567891011121314151617181920212223242526272829303132333435363738
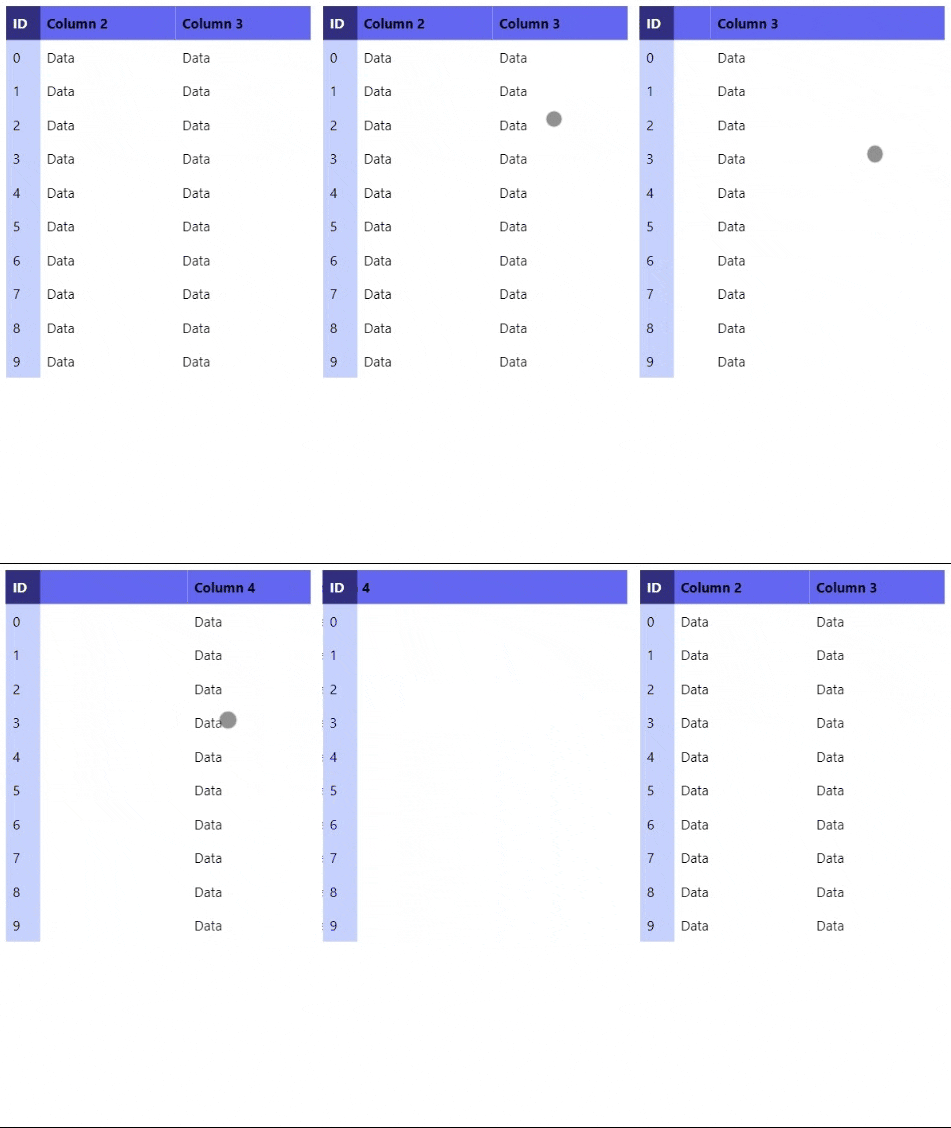
Here's the output. We stickied the first column to the left by using sticky to the first <th> and <td> elements:

Medium - Table with 2 or more Sticky Columns #
Having two or more sticky columns gets a bit tricky because you have to accurately position the left property of the second column to the width of the first column.
Here's an updated example:
import React from "react"; const Table = () => { // array to populate rows const arr = new Array(10).fill("x"); return ( <div className="overflow-auto"> <table className="table-fixed w-full"> <thead> <tr className="text-left"> <th className="w-10 p-2 sticky left-0 bg-indigo-900 text-white"> ID </th> {/* notice how we use left-[40px] because `w-10` equals 40px */} <th className="w-40 p-2 sticky left-[40px] bg-indigo-900 text-white"> Column 2 </th> <th className="w-96 p-2 bg-indigo-500">Column 3</th> <th className="w-96 p-2 bg-indigo-500">Column 4</th> </tr> </thead> <tbody> {arr.map((item, index) => { return ( <tr key={index} className="text-left"> <td className="w-10 p-2 sticky left-0 bg-indigo-200"> {index} </td> {/* notice how we use left-[40px] because `w-10` equals 40px */} <td className="w-96 p-2 left-[40px] bg-indigo-200">Data</td> <td className="w-96 p-2">Data</td> <td className="w-96 p-2">Data</td> </tr> ); })} </tbody> </table> </div> ); }; export default Table;123456789101112131415161718192021222324252627282930313233343536373839404142
Here's the output:

Note that for multiple sticky columns to work, the ordering of the columns has to be correct. All the stickied columns must be ordered correctly.
For example, the code below does NOT work:
import React from "react"; const Table = () => { // array to populate rows const arr = new Array(10).fill("x"); return ( <div className="overflow-auto"> <table className="table-fixed w-full"> <thead> <tr className="text-left"> <th className="w-10 p-2 sticky left-0 bg-indigo-900 text-white"> ID </th> <th className="w-40 p-2 bg-indigo-500">Column 2</th> <th className="w-96 p-2 bg-indigo-500">Column 3</th> <th className="w-96 p-2 bg-indigo-500 sticky left-[40px]"> Column 4 </th> </tr> </thead> <tbody> {arr.map((item, index) => { return ( <tr key={index} className="text-left"> <td className="w-10 p-2 sticky left-0 bg-indigo-200"> {index} </td> <td className="w-40 p-2 ">Data</td> <td className="w-96 p-2">Data</td> <td className="w-96 p-2 sticky left-[40px]">Data</td> </tr> ); })} </tbody> </table> </div> ); }; export default Table;12345678910111213141516171819202122232425262728293031323334353637383940
Here, only the first column will be stickied. We use sticky on the fourth column, but the columns before it has no sticky class.
Hard - Creating Dynamic Sticky Columns #
Now that we know how to create sticky columns using Tailwind CSS, let's increase the difficulty by making dynamic sticky columns. What if there's a requirement to select any column to be stickied on runtime? How should you implement it?
For this example, I'm using pure react since we don't need too much functionality. However, I also recommend using @tanstack/react-table if you have many features in your table or complex scenarios.
Step 1 - Defining the Types #
First, let's define the types that we'll be using in our table since this also connects to our column definition. Create the file components/DynamicTable.tsx:
// components/DynamicTable.tsx

type User = {
  id: number;
  email: string;
  last_visited_at: string;
  created_at: string;
  ip_address: string;
  gender: string;
};

type ColumnDef<T> = {
  header: string; //header Text
  accessorKey: keyof T; //key for how to get the value
  width: number; // column width
  isPinned?: boolean; //column pinned state
};1234567891011121314151617
Step 2 - Defining the Columns #
Next, let's define the columns of our table:
// components/DynamicTable.tsx
const defaultColumns: ColumnDef<User>[] = [
  {
    header: "id",
    accessorKey: "id",
    width: 60,
  },
  {
    header: "Email",
    accessorKey: "email",
    width: 250,
  },
  {
    header: "Last Visited At",
    accessorKey: "last_visited_at",
    width: 200,
  },
  {
    header: "Created At",
    accessorKey: "created_at",
    width: 200,
  },
  {
    header: "IP Address",
    accessorKey: "ip_address",
    width: 200,
  },
  {
    header: "Gender",
    accessorKey: "gender",
    width: 200,
  },
];123456789101112131415161718192021222324252627282930313233
Step 3 - Generating the Data #
Next, we'll use fakerjs to generate the data that we'll be using. Install faker by using the following command:
# npm
npm i @faker-js/faker
# yarn
yarn add @faker-js/faker
Now add the following to your code:
// components/DynamicTable.tsx
// generate random data
const data = new Array(10).fill("x").map<User>((item, index) => {
  return {
    id: index,
    email: faker.internet.email(),
    gender: faker.name.gender(true),
    ip_address: faker.internet.ipv4(),
    created_at: faker.date.past().toDateString(),
    last_visited_at: faker.date.recent().toDateString(),
  };
});123456789101112
Now that we have the column definitions and randomly generated data, all that's left is to implement the table.
Step 4 - Implementing a Dynamic Table #
Define a component called DynamicTable and copy the following code below. I've added comments so make sure you don't skip reading them.
// components/DynamicTable.tsx import React, { useState } from "react"; import classNames from "classnames"; // ... omitted for brevity const DynamicTable = () => { const [columns, setColumns] = useState([...defaultColumns]); // logic to pin a specific column // 1. modify the isPinned property // 2. sort the columns so that isPinned is first // 3. use setColumns to re-render the component const onPinColumn = (accessorKey: string, isPinned: boolean = false) => { const newCols = columns.map((col) => { if (col.accessorKey === accessorKey) { return { ...col, isPinned, }; } return col; }); newCols.sort((a, b) => { const aPinned = a.isPinned ? 1 : 0; const bPinned = b.isPinned ? 1 : 0; return bPinned - aPinned; }); return setColumns([...newCols]); }; // logic to get sticky position for columns // 1. find all the previous columns // 2. add the total width of all the previous columns. const getLeftStickyPos = (index: number) => { if (!index) return 0; const prevColumnsTotalWidth = columns .slice(0, index) .reduce((curr, column) => { return curr + column.width; }, 0); return prevColumnsTotalWidth; }; return ( <div className="overflow-auto max-h-[400px]"> <table className="table-fixed w-full"> <thead> <tr> {columns.map((col, i) => { return ( <th className={classNames({ "p-2 text-left whitespace-nowrap": true, "bg-indigo-500": !col.isPinned, "sticky bg-indigo-900 text-indigo-50": col.isPinned, })} style={{ left: getLeftStickyPos(i), width: col.width, }} key={col.header} > {col.header} <button onClick={() => onPinColumn(col.accessorKey, !col.isPinned)} className="mx-2 text-xs text-white" > {col.isPinned ? "x" : "pin"} </button> </th> ); })} </tr> </thead> </table> </div> ); }; export default DynamicTable;12345678910111213141516171819202122232425262728293031323334353637383940414243444546474849505152535455565758596061626364656667686970717273747576777879808182
Here, we're only rendering the headers but it has the following output:

Next, let's render the data along with it.
Step 4 - Rendering the Data #
To render the data, all we have to do is to map through the data and map through each column. We'll use the accessorKey property to get the value for the data. For example:
// components/DynamicTable.tsx const DynamicTable = () => { const [columns, setColumns] = useState([...defaultColumns]); // ... return ( <div className="overflow-auto max-h-[400px]"> <table className="table-fixed w-full"> <head> {/* ... */} </thead> <tbody> {data.map((item, index) => { return ( <tr key={index} className="text-left"> {columns.map((col, i) => { const accessorKey = col.accessorKey; const value = item[accessorKey]; return ( <td className={classNames({ "p-2": true, "sticky bg-indigo-200": col.isPinned, })} style={{ left: getLeftStickyPos(i), width: col.width, }} key={col.header} > {value} </td> ); })} </tr> ); })} </tbody> </table> </div> ); }; export default DynamicTable;123456789101112131415161718192021222324252627282930313233343536373839404142434445
After this step, you should have the same output as our final output above.
Code and Demo #
The full code is available at my GitHub: jmarioste/react-table-sticky-column-tailwind-tutorial.
The demo is available on StackBlitz: React Table Sticky Column Tailwind Tutorial
Conclusion #
You learned how to create a react table with dynamic sticky columns from simple to a bit of an advanced example.
If you like this tutorial, please leave a like or share this article. For future tutorials like this, please subscribe to our newsletter or follow me on GitHub.
Resources #
To learn more about sticky columns, I suggest you read the tutorial below as well.
Credits: Image by Mrexentric from Pixabay


