How to Modify DaisyUI Radial Progress to Have a Straight Line Cap

Jasser Mark Arioste

In one of my projects I use DaisyUI component library for its speed and flexibility. And in one of my react components, I had to use DaisyUI radial progress however I didn't like the rounded line caps for the default radial progress components. In this tutorial, we're going to modify daisyUI radial progress component to have a straight line cap as shown below.

How does DaisyUI implement the rounded line cap? #
In order to implement the straight line cap, first we have to ask ourselves how does daisyUI implement the rounded line cap so that we can make the correct modifications.
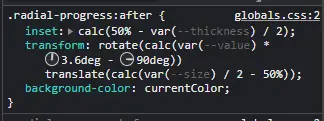
Upon closer inspection, the radial-progress class has 2 pseudo-elements, before and after which are the target elements for the radial-progress class. The radial-gradient and inset properties are causing the curved or rounded linecaps.


Creating the utility classes for a straight line cap #
We have to make modifications to these two pseudo-elements. In our globals.css file let's create two classes:
#globals.css @tailwind base; @tailwind components; @tailwind utilities; .radial-progress.radial-square::before { #just remove the radial-gradient background to remove the start line cap background: conic-gradient(currentColor calc(var(--value) * 1%), #0000 0); } .radial-progress.radial-square::after { #just unset the inset to remove the end line cap inset: unset; }123456789101112131415
Usage #
Usage is very simple, we just add radial-square class to an element with radial-progress class.
<div
  className="radial-progress radial-square text-primary"
  style={{ "--value": 75 }}
>
 75%
</div>1234567
There you have it. We have the following output:

Conclusion #
We've successfully modified DaisyUI radial progress to create a straight line cap. One important thing to note is we have to understand the component first before we made modifications. I'd say it's one of the skills that great developers have, so if you come across situations like these in the future, be sure to investigate the code first and do your modifications after.
If you like tutorials like these, please consider signing up to our newsletter below.
Credits: Image by Julius Silver from Pixabay


