How to add Google Analytics 4 to NextJS (with TypeScript)

Jasser Mark Arioste

In this tutorial I'll show you how to add Google Analytics 4 to an existing NextJS Typescript application. We'll start by creating a GA Tracking ID. Then we'll modify our NextJS app to use GA. As a bonus, we'll also add typings for gtag.js to enable type safety when adding events.
Step 1: Create a Google Analytics Tracking ID #
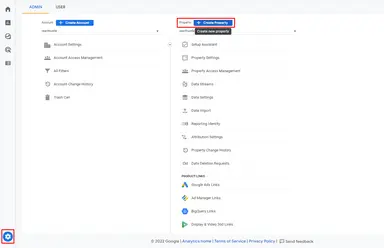
Create a GA4 property by going to your admin settings and clicking Create Property.
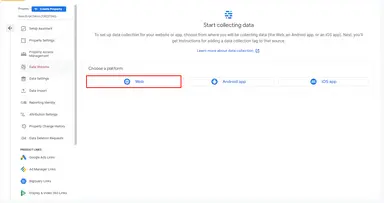
Fill-in the details about your website and your business, then you should end up in the data streams panel shown below. Let's create a data stream by first click Web as shown below:
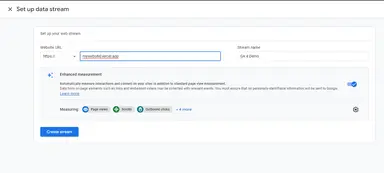
Fill-in the details and click Create stream:
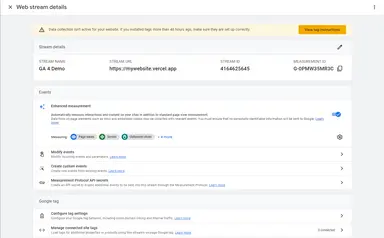
After that you should see the Web stream details below and get the Measurement ID:
Step 2: Adding the measurement ID to NextJS #
Add the measurement ID to your environment variables. In my case I'll add it to a local .env file as shown below.
.env # replace it with your GA4 tracking ID. NEXT_PUBLIC_GA4_TRACKING_ID="G-0PMW35MR3C"123
Step 3: Adding Google Analytics to NextJS #
Create a _document.tsx file and add the initialization script for gtag. This is necessary to prevent the error: window.gtag is not defined for Next.js-hydration
//pages/document.tsx import { Html, Head, Main, NextScript } from "next/document"; export default function Document() { return ( <Html> <Head /> <body> <Main /> <NextScript /> {/* Global Site Tag (gtag.js) - Google Analytics */} {/* Necessary to prevent error: window.gtag is not defined for Next.js-hydration */} <script dangerouslySetInnerHTML={{ __html: ` window.dataLayer = window.dataLayer || []; function gtag(){dataLayer.push(arguments);} gtag('js', new Date()); `, }} /> </body> </Html> ); }123456789101112131415161718192021222324252627
Next, create a GoogleAnalytics.tsx component and add it to _app.tsx. This will be the main component to handle google analytics.
//components/GoogleAnalytics.tsx import { useRouter } from "next/router"; import Script from "next/script"; import { memo, useEffect } from "react"; const TRACKING_ID = process.env.NEXT_PUBLIC_GA4_TRACKING_ID!; const GoogleAnalytics = () => { const router = useRouter(); // 👇 send page views when users gets to the landing page useEffect(() => { if (!TRACKING_ID || router.isPreview) return; gtag("config", TRACKING_ID, { send_page_view: false, //manually send page views to have full control }); gtag("event", "page_view", { page_path: window.location.pathname, send_to: TRACKING_ID, }); }, []); // 👇 send page views on route change useEffect(() => { const handleRouteChange = (url: string) => { if (!TRACKING_ID || router.isPreview) return; // manually send page views gtag("event", "page_view", { page_path: url, send_to: TRACKING_ID, }); }; router.events.on("routeChangeComplete", handleRouteChange); router.events.on("hashChangeComplete", handleRouteChange); return () => { router.events.off("routeChangeComplete", handleRouteChange); router.events.off("hashChangeComplete", handleRouteChange); }; }, [router.events, router.isPreview]); // 👇 prevent rendering scripts if there is no TRACKING_ID or if it's preview mode. if (!TRACKING_ID || router.isPreview) { return null; } return ( <> <Script src={`https://www.googletagmanager.com/gtag/js?id=${TRACKING_ID}`} ></Script> {/* 👇 gtag function definition. notice that we don't send page views at this point. */} <Script id="gtag-init" dangerouslySetInnerHTML={{ __html: ` window.dataLayer = window.dataLayer || []; function gtag(){dataLayer.push(arguments);} gtag('js', new Date()); `, }} /> </> ); }; export default memo(GoogleAnalytics);1234567891011121314151617181920212223242526272829303132333435363738394041424344454647484950515253545556575859
Explanation:
Lines 9-18: This useEffect only runs once. The configures gtag to use send page views manually. Then we send the page_view event. All other events like user_engagement will still be sent automatically by google analytics.
Lines 20-35: This useEffect runs on every route change and sends the page views.
Lines 37-39: We don't render the scripts when there is no TRACKING_ID and if the page is in preview mode.
Lines 42-55: Render the GA scripts.
Modify _app.tsx a bit.
//pages/_app.tsx import "../styles/globals.css"; import type { AppProps } from "next/app"; import GoogleAnalytics from "../components/GoogleAnalytics"; function MyApp({ Component, pageProps }: AppProps) { return ( <> <GoogleAnalytics /> <Component {...pageProps} /> </> ); } export default MyApp;123456789101112131415
I found this best since any change in router will only affect the GoogleAnalytics component and not re-render the whole App component while still tracking pageviews correctly.
Step 4: Bonus - Fixing cannot find name 'gtag' #
To fix the type error let's add @types/gtag.js add typings when firing gtag events.
yarn add @types/gtag.js
#or
npm install @types/gtag.js12
After this installation you should see the type error go away and hovering on gtag will show us the type definition:

Last step: Checking if everything works #
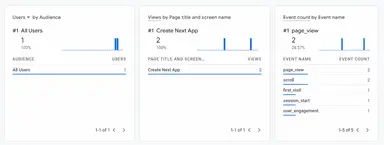
Let us check our GA4 dashboard and check if everything works correctly. We can go to realtime report and check if all the events are firing.
Why not use ReactGA4? #
Simply because there are no typings to ReactGA4 package when tracking events. Having typings to gtag ensures that we pass the correct data every time.
Conclusion #
We've successfully integrated google analytics 4 to an existing NextJS Application and add typings to gtag for more maintainability.
Thank you for reading! If you like tutorials like these, please leave a like or consider subscribing to our newsletter below.
Credits: Image by xiSerge from Pixabay


