Ultimate Guide on how to setup Editor.js with Next.js 12+ (Typescript)

Jasser Mark Arioste

EditorJS is an awesome rich text editor. However, there are many issues with just setting it up in Next.js 12 or React 18, and especially when you combine typescript into the mix.
We are going to setup editor.js and afterwards, check the issues encountered by some developers before. We won't be using react-editor-js, I found it better to use the @editorjs/editorjs package only since we can directly access the types and have lesser dependencies.
Here's a link to the final output: https://editorjs-next.vercel.app/
What is Editor.JS? #
Editor.js is a block-style editor for rich media stories. It outputs clean data in JSON instead of heavy HTML markup. And more important thing is that Editor.js is designed to be API extendable and pluggable.- Quote from editorjs.io
Project Setup #
Lets create a brand new Next.js application with typescript setting.
npx create-next-app --ts editorjs-next1
Lets Install the dependencies:
cd editorjs-next1
yarn add @editorjs/editorjs @editorjs/code @editorjs/paragraph1
Creating the Editor component #
First lets create EditorTools.js (Javascript) since the plugins for editorjs doesn't have types. This is a good way to avoid the typescript errors since we're only using them for the config.
//./components/EditorTools.js import Code from "@editorjs/code"; import Header from "@editorjs/header"; import Paragraph from "@editorjs/paragraph"; export const EDITOR_TOOLS = { code: Code, header: Header, paragraph: Paragraph };123456789
Next let's create the editor component.
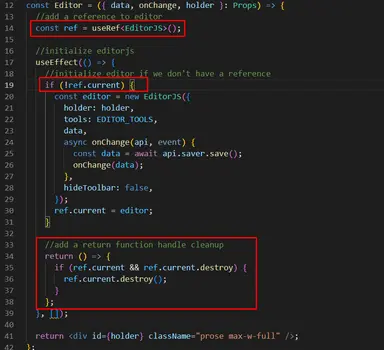
//./components/Editor import React, { memo, useEffect, useRef } from "react"; import EditorJS, { OutputData } from "@editorjs/editorjs"; import { EDITOR_TOOLS } from "./EditorTools"; //props type Props = { data?: OutputData; onChange(val: OutputData): void; holder: string; }; const EditorBlock = ({ data, onChange, holder }: Props) => { //add a reference to editor const ref = useRef<EditorJS>(); //initialize editorjs useEffect(() => { //initialize editor if we don't have a reference if (!ref.current) { const editor = new EditorJS({ holder: holder, tools: EDITOR_TOOLS, data, async onChange(api, event) { const data = await api.saver.save(); onChange(data); }, }); ref.current = editor; } //add a return function handle cleanup return () => { if (ref.current && ref.current.destroy) { ref.current.destroy(); } }; }, []); return <div id={holder} />; }; export default memo(EditorBlock);123456789101112131415161718192021222324252627282930313233343536373839404142434445
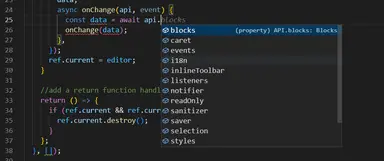
Below is how to initialize editor.js without using react-editor-js package. This is awesome because we have access to the types/intellisense of editor.js. See the screenshot below. We have full access to the editor.js api whenever we need it. Having access to these methods just gives us a more maintainable application.

Using the Editor component
#
The only thing to remember when using the editor component is to use dynamic loading from next.js, we can't really render it server-side since editor.js library uses window object. Attempting to use static import will result in an error.
//index.tsx import { OutputData } from "@editorjs/editorjs"; import type { NextPage } from "next"; import dynamic from "next/dynamic"; import { useState } from "react"; // important that we use dynamic loading here // editorjs should only be rendered on the client side. const EditorBlock = dynamic(() => import("../components/Editor"), { ssr: false, }); const Home: NextPage = () => { //state to hold output data. we'll use this for rendering later const [data, setData] = useState<OutputData>(); return ( <EditorBlock data={data} onChange={setData} holder="editorjs-container" /> ); }; export default Home;123456789101112131415161718192021
Run the app and see the output #
yarn dev1
Running the app gives us the output below:

Apply styling to the editor #
We've sucessfully setup Editor.js however when using the header block, its not properly styled when we write to the editor. One way I like to style it using @tailwindcss/typography prose class. It automatically applies styling in all the elements of our Editor component
The nice thing about about tailwind is we can plug it in to any project since they are only utility classes. Let's setup tailwindcss in our Next.js project and install some dependencies.
yarn add tailwindcss autoprefixer postcss @tailwindcss/typography1
Create tailwindcss.config.js and postcss.config.js files at the root project directory and copy-paste the code below.
//tailwindcss.config.js /** @type {import('tailwindcss').Config} */ module.exports = { content: [ "./pages/**/*.{js,ts,jsx,tsx}", "./components/**/*.{js,ts,jsx,tsx}", ], theme: { container: { center: true, padding: { DEFAULT: "1rem", }, }, plugins: [require("@tailwindcss/typography")], };1234567891011121314151617
//postcss.config.js module.exports = { plugins: ["tailwindcss"], };1234
To fully activate tailwind, lets add the tailwind classes to our global.css file
#global.css

@tailwind base;
@tailwind components;
@tailwind utilities;

html,
body {
  padding: 0;
  margin: 0;
  font-family: -apple-system, BlinkMacSystemFont, Segoe UI, Roboto, Oxygen,
    Ubuntu, Cantarell, Fira Sans, Droid Sans, Helvetica Neue, sans-serif;
}12345678910111213
Apply styling to our index.tsx file
//index.tsx
...
<div className="container max-w-4xl">
  <EditorBlock data={data} onChange={setData} holder="editorjs-container" />
</div>
...123456
Apply styling to our Editor.tsx component
//Editor.tsx
...
<div id={holder} className="prose max-w-full" />;
...1234
And now we have proper styles in our Editor component

Rendering the contents of our editor #
Now that we have successfully configured our editor for the basic plugins. Let's look at how to render the data from the editor. Let's install the dependency editorjs-html. This is a great package since it allows us to customize how we render the data.
yarn add editorjs-html1
Let's create a EditorJsRenderer.tsx component that accepts the OutputData as props. OutputData is the data used and received by EditorJS.
//components/EditorJsRenderer.tsx import { OutputData } from "@editorjs/editorjs"; import React from "react"; //use require since editorjs-html doesn't have types const editorJsHtml = require("editorjs-html"); const EditorJsToHtml = editorJsHtml(); type Props = { data: OutputData; }; type ParsedContent = string | JSX.Element; const EditorJsRenderer = ({ data }: Props) => { const html = EditorJsToHtml.parse(data) as ParsedContent[]; return ( //✔️ It's important to add key={data.time} here to re-render based on the latest data. <div className="prose max-w-full" key={data.time}> {html.map((item, index) => { if (typeof item === "string") { return ( <div dangerouslySetInnerHTML={{ __html: item }} key={index}></div> ); } return item; })} </div> ); }; export default EditorJsRenderer;1234567891011121314151617181920212223242526272829303132
Let's modify index.tsx to show the editor and preview.
//index.tsx import { OutputData } from "@editorjs/editorjs"; import type { NextPage } from "next"; import dynamic from "next/dynamic"; import { useState } from "react"; import EditorJsRenderer from "../components/EditorJsRenderer"; // important that we use dynamic loading here // editorjs should only be rendered on the client side. const EditorBlock = dynamic(() => import("../components/Editor"), { ssr: false, }); const Home: NextPage = () => { //state to hold output data. we'll use this for rendering later const [data, setData] = useState<OutputData>(); return ( <div className="grid grid-cols-2 gap-2"> <div className="col-span-1 "> <h1>Editor</h1> <div className="border rounded-md"> <EditorBlock data={data} onChange={setData} holder="editorjs-container" /> </div> </div> <div className="col-span-1 "> <h1>Preview</h1> <div className="border rounded-md"> <div className="p-16">{data && <EditorJsRenderer data={data} />}</div> </div> </div> </div> ); }; export default Home;123456789101112131415161718192021222324252627282930313233343536373839
Awesome. now the output should be something like this

Common Problems when setting up Editor.js in React 18 / Next.js v12 #
1. ReferenceError: window is not defined
The solution for this is to import the comonent using dynamic import and {ssr: false}
// important that we use dynamic loading here // editorjs should only be rendered on the client side. const EditorBlock = dynamic(() => import("../components/Editor"), { ssr: false, });12345
2. The Editor is rendered/initialized twice.

The solution is to keep a reference to the editor using useRef and add a guard statement to check if it's already initialized.

Conclusion #
We have successfully setup editor.js in React 18+ / Nextjs 12.3.1 while having type safety in our typescript usage. We also went through on how to render the data and discussed common problems related to setting up editor.js in React 18 and Next.js 12.3.1
Resources #
Full code is available here:
https://github.com/jmarioste/editorjs-next
Credits:
Image by 🌼Christel🌼 from Pixabay


