How to Implement Password Validation using Yup and Formik

Jasser Mark Arioste

Hello! In this tutorial, you'll learn how to create a password schema validation using yup. And we'll demonstrate its usage in React using Formik.
Introduction #
In one of my projects, I had to implement password validation for the user registration form component.
It had the following requirements:
- Password should have at least 8 characters. Otherwise, a validation error should be displayed.
- It should have at least 1 uppercase, lowercase, and digit character. The error messages should be separate for each lacking character.
- The
confirmPasswordfield should have the same value as thepasswordfield.
If I had to implement this from scratch, even with more than ten years of experience, it would take longer than it needs to if I didn't use the schema validation library: Yup.
Creating the Schema #
To implement the password validation, first, we have to create the schema.
// schema/passwordSchema.ts import { object, string, ref } from "yup"; const getCharacterValidationError = (str: string) => { return `Your password must have at least 1 ${str} character`; }; export const passwordSchema = object({ password: string() .required("Please enter a password") // check minimum characters .min(8, "Password must have at least 8 characters") // different error messages for different requirements .matches(/[0-9]/, getCharacterValidationError("digit")) .matches(/[a-z]/, getCharacterValidationError("lowercase")) .matches(/[A-Z]/, getCharacterValidationError("uppercase")), confirmPassword: string() .required("Please re-type your password") // use oneOf to match one of the values inside the array. // use "ref" to get the value of passwrod. .oneOf([ref("password")], "Passwords does not match"), });123456789101112131415161718192021
Using the Schema in Formik #
To use the schema in a react, or formik we just have to pass it to the validationSchema property:
// components/PasswordForm.tsx import React from "react"; import { Field, Formik, Form } from "formik"; import { passwordSchema } from "schema/passwordSchema"; const PasswordForm = () => { return ( <Formik initialValues={{ password: "", confirmPassword: "" }} onSubmit={(values) => { console.log(values); }} validationSchema={passwordSchema} > {/* use renderProp to get the all the errrors */} {({ errors }) => { return ( <Form className="flex flex-col gap-2"> <Field name="password" className="input input-bordered"></Field> {/* render password error in the UI */} {!!errors.password && ( <p className="text-error">{errors.password}</p> )} <Field name="confirmPassword" className="input input-bordered" ></Field> {/* render confirmPassword error in the UI */} {!!errors.confirmPassword && ( <p className="text-error">{errors.confirmPassword}</p> )} <button className="btn btn-accent"> Submit </button> </Form> ); }} </Formik> ); }; export default PasswordForm;123456789101112131415161718192021222324252627282930313233343536373839
Full Code and Demo #
The full code is available on Github: jmarioste/yup-password-validation
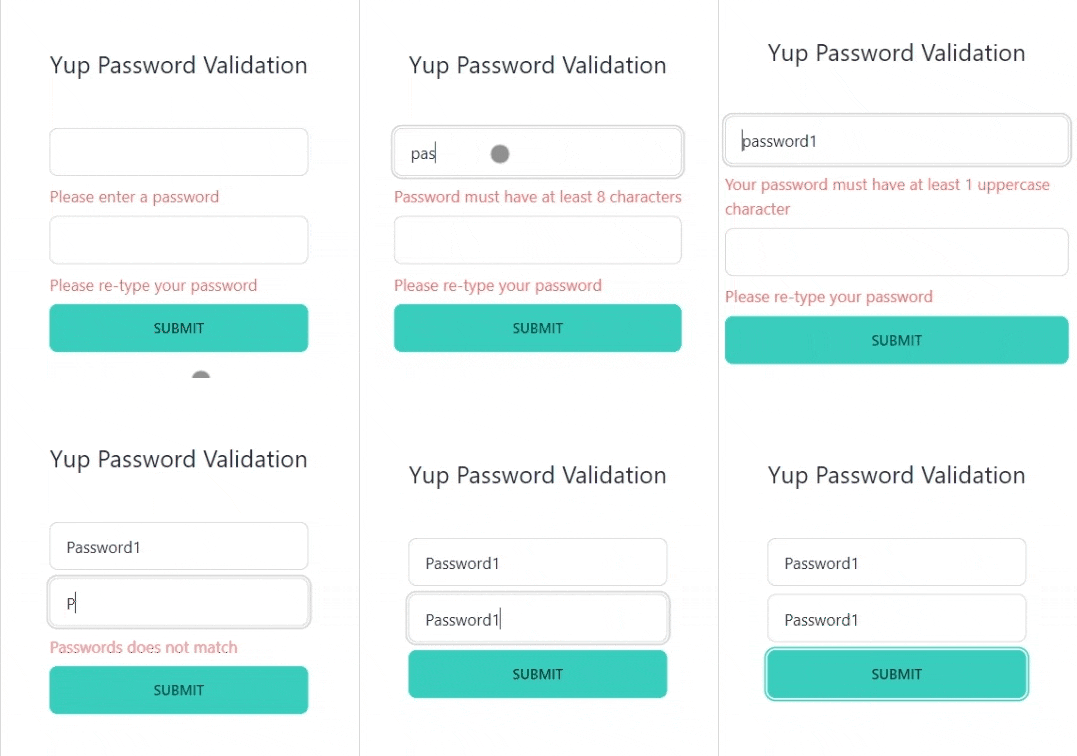
Here's the demo. You can also play with it on Stackblitz: Yup Password Validation

Notice how there's a different error for each lacking character for the password field. Also, notice the confirmPassword error.
Conclusion #
You learned how to create a reusable password validation schema using Yup and use it in a Formik form! Yup is an incredibly flexible schema validation library and you'll be able to almost always match your project requirements.
Resources #
Always make sure to read the docs for more info! If you find a problem, the answer is usually in the docs!
Credits: Image by 🌼Christel🌼 from Pixabay


