Build Multi-Page Forms with Formik and NextJS

Jasser Mark Arioste

Hello, hustlers! In this tutorial, you will learn how to build a multi-page form with Formik. You will learn how to retain the form state across multiple tabs using the Formik provider and NextJS shallow routing.
The Problem #
In one of my projects, I was tasked with building a CMS backend for the PostDetail page. A post was split into multiple tabs and routes, and there is one "Update Post" button that is visible for all the tabs. The "Update Post" button is disabled if there are no changes across multiple tabs.
In addition, each tab will have one separate route. For example, `/cms/post/{slug}/seo` for the SEO metadata, and `/cms/post/{slug}/content` for the post content. If there are any modifications to either one of these, the "Update Post" button should be enabled.
Now that we know what we want, let's start this mini-project. We'll follow these steps:
- Project Setup
- Creating the Tabs component for navigation:
/cms/posts/{slug},cms/posts/{slug}/content,/cms/posts/{slug}/seo - Creating form components for each route.
- Creating the "Update Post" button.
- Adding Initial values
- Modifying the "Update Post" button behavior
Step 1 - Project Setup - Formik + NextJS #
I created a GitHub repo If you want to follow along with this tutorial. I use tailwind and daisyUI for styling but you can modify it if you'd like. You can immediately set it up in your local environment by running the command:
npx create-next-app -e https://github.com/jmarioste/formik-multi-page-tutorial/tree/starting-point formik-tutorial1
Next, you can run it by doing:
cd formik-tutorial && yarn dev1
This will start a server in your local environment, then you can go to http://localhost:3000

Step 1.1 - Adding Formik and classnames package
Before we move on to step 2, let's add formik and classnames package. Formik is the main dependency for this project, while classnames package just makes our lives easier when manipulating classes.
Run the command:
yarn add formik classnames1
Step 2 - Creating the Tabs Component for Navigation #
In this step, you will create the Tabs, as well as the page routes.
Next, we'll create the PostDetailTabs component, which will handle navigation between tabs. Create a file components/post/PostDetailTabs.tsx
import React from 'react'
import classNames from "classnames";
import Link from "next/link";
import { useRouter } from 'next/router';
const PostDetailTabs = () => {
  const router = useRouter();
  const params = Array.isArray(router.query.slug)
    ? (router.query.slug as string[])
    : [];
  const [slug, currentTab = ""] = params;
  const tabInfo = [
    { url: `/cms/post/${slug}`, text: "PostInfo", activeMatcher: "" },
    { url: `/cms/post/${slug}/content`, text: "Content", activeMatcher: "content" },
    { url: `/cms/post/${slug}/seo`, text: "SEO Metadata", activeMatcher: "seo" }
  ]
  return (
    <div>
      <div className="tabs">
        {
          tabInfo.map((tab, index) => {
            return <Link href={tab.url} key={index} shallow={true}>
              <a className={classNames({
                "tab tab-bordered": true,
                "tab-active": tab.activeMatcher === currentTab,
              })}>{tab.text}</a>
            </Link>
          })
        }
      </div>
    </div>
  )
}
export default PostDetailTabs123456789101112131415161718192021222324252627282930313233
Explanation:
Lines 6-8: we parse the params from [...slug], we're expecting this to include the slug itself and the currentTab.
Lines 10-14: We define data for our tabs.
Lines 19-26: We render the data. We use NextJS <Link/> component, and use shallow={true} along with daisyUI classes for styling.
Next, create the components/post/PostDetail.tsx file. Later, we will add initialValues and a proper onSubmit handler that simulates an API call.
// components/post/PostDetail.tsx import { Formik } from "formik"; import React from "react"; import PostDetailTabs from "./PostDetailTabs"; const PostDetail = () => { return ( <Formik initialValues={{}} onSubmit={(values) => { console.log("onSubmit", values) }}> <div className="container"> <h1 className="text-2xl font-bold my-2">Update Post</h1> <PostDetailTabs /> </div> </Formik > ); }; export default PostDetail;123456789101112131415
Line 7: For now, we initialize formik with empty values just to satisfy the props. Remember we're still building the UI.
First, create a file: `/pages/cms/post/[...slug].tsx`. This is our route handler to update each post.
// pages/cms/post/[...slug].tsx
import PostDetail from 'components/post/PostDetail'
import React from 'react'
export default PostDetail1234
Note that we only exported the PostDetail component here. You might wonder why. I find it much easier to place all the components inside the /components folder, including the ones for routing. This is especially useful in a large app.
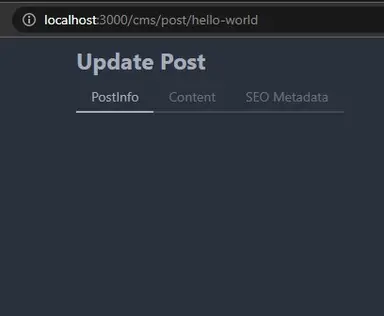
After this is done, you can navigate to http://localhost:3000/cms/post/hello-world to see the current output:

Step 3 - Creating form components for each route. #
Step 3.1 - Defining the <PostInfoTab/> component
Let's quickly add form inputs for each route. First, create the <PostInfoTab/> component, which will contain headline and slug fields. Create the file `/components/post/PostInfoTab.tsx`.
// components/post/PostInfoTab.tsx
import { Field } from 'formik'
import React from 'react'
const PostInfoTab = () => {
  return (
    <div>
      <div className="form-control">
        <label className='label text-accent'>
          <span>Headline</span>
        </label>
        <Field name="headline" type="text" className="input input-bordered" placeholder="headline" />
        <label className='label text-accent'>
          <span>Slug</span>
        </label>
        <Field name="slug" type="text" className="input input-bordered" placeholder="slug" />
      </div>
    </div>
  )
}
export default PostInfoTab1234567891011121314151617181920
Step 3.2 - Defining the <PostContentTab/> component
Create the file `/components/post/PostContentTab.tsx`. This will contain the post content itself.
// components/post/PostInfoTab.tsx
import { Field } from 'formik'
import React from 'react'
const PostContentTab = () => {
  return (
    <div>
      <div className="form-control">
        <label className='label text-accent'>
          <span>Content</span>
        </label>
        <Field as="textarea" name="content" className="input input-bordered" placeholder="Write a great article..." />
      </div>
    </div>
  )
}
export default PostContentTab12345678910111213141516
Step 3.3 - Defining the <PostSeoMetadataTab/> component
Create the file `/components/post/PostSeoMetadataTab.tsx`. This will contain SEO metadata fields.
import { Field } from 'formik'
import React from 'react'
const PostSeoMetadataTab = () => {
  return (
    <div>
      <div className="form-control">
        <label className='label text-accent'>
          <span>Page Title</span>
        </label>
        <Field name="title" type="text" className="input input-bordered" placeholder="title" />
        <label className='label text-accent'>
          <span>Meta Description</span>
        </label>
        <Field name="description" type="text" className="input input-bordered" placeholder="description" />
      </div>
    </div>
  )
}
export default PostSeoMetadataTab12345678910111213141516171819
Step 3.4 - Updating <PostDetailTabs/> Component
Let's update <PostDetailTabs/> component to render the correct Tab component depending on the route:
import React, { useMemo } from 'react'
...
import PostContentTab from './PostContentTab';
import PostInfoTab from './PostInfoTab';
import PostSeoMetadataTab from './PostSeoMetadataTab';
const PostDetailTabs = () => {
  ...
  const TabComponent = useMemo(() => {
    switch (currentTab) {
      case "content": return <PostContentTab />;
      case "seo": return <PostSeoMetadataTab />;
      default:
        return <PostInfoTab />
    }
  }, [currentTab])
  return (
    <div>
      <div className="tabs">
        {
          ...
        }
      </div>
      {TabComponent}
    </div>
  )
}
export default PostDetailTabs123456789101112131415161718192021222324252627
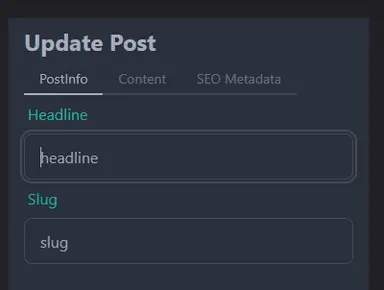
Now we have field inputs depending on the current tab / route:

Step 4 - Creating UpdatePostButton Component
#
For step 4, we'll create the <UpdatePostButton/> component. For now, let's implement the UI, well add functionality later. Create the file /components/post/UpdatePostButton.tsx.
import React from 'react'

const UpdatePostButton = () => {
  return (
    <div className='fixed bottom-4 right-4'>
      <button type="submit" className='btn btn-primary'>Update Post</button>
    </div>
  )
}

export default UpdatePostButton1234567891011
Next, let's update <PostDetailTabs/> component to render the <UpdatePostButton/> component:
// components/post/PostDetailTabs.tsx
..
import UpdatePostButton from './UpdatePostButton';
const PostDetailTabs = () => {
  ...
  return (
    <div>
      <div className="tabs">
        ...
      </div>
      {TabComponent}
      <UpdatePostButton />
    </div>
  )
}

export default PostDetailTabs1234567891011121314151617
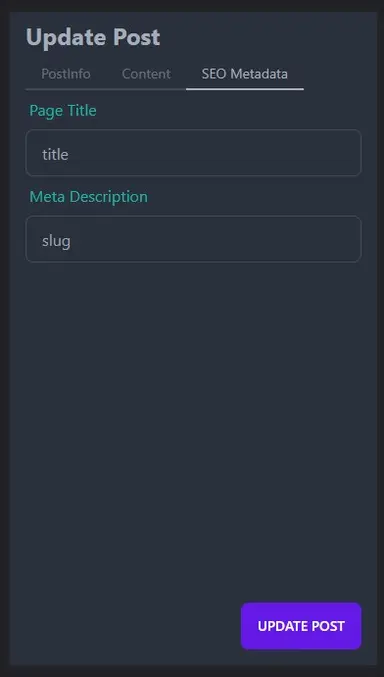
After this step, we've completed all the necessary UI. Looking good!

Step 5 - Formik initialValues and onSubmit
#
Next, we'll implement the initialValues and onSubmit handler. Modify the <PostDetail/> component as below:
// components/post/PostDetail.tsx import { Form, Formik } from "formik"; import React from "react"; import PostDetailTabs from "./PostDetailTabs"; const PostDetail = () => { const initialValues = { slug: "hello-world", headline: "Hello, world", content: "In this tutorial, you will learn about hello, world in javascript.", seo: { title: "Hello, world | React Hustle", description: "In this tutorial, you will learn about hello, world in javascript.", }, }; return ( <Formik initialValues={initialValues} onSubmit={(values, helpers) => { helpers.setSubmitting(true); console.log("onSubmit", values); //you should call backend api here. //setTimoue to simulate api call setTimeout(() => { helpers.setSubmitting(false); helpers.resetForm({ values }) }, 2000); }} > <Form className="container"> <h1 className="text-2xl font-bold my-2">Update Post</h1> <PostDetailTabs /> </Form> </Formik> ); }; export default PostDetail;1234567891011121314151617181920212223242526272829303132333435363738
Lines #6-16: We hardcode the initialValues. in a real app, these values are fetched from your backend API.
Line #19: We pass the initialValues to the Formik provider.
Line #21-29: First we set the form state to submitting. And to simulate a backend API call, we use setTimeout and reset the form with the updated values. This is useful since we will disable the <UpdatePostButton/> component if the form is dirty. By resetting the form with the updated values, we set the form not dirty.
Step 6 - Modifying <UpdatePostButton/>
#
// components/post/UpdatePostButton.tsx
import classNames from 'classnames';
import { useFormikContext } from 'formik';
import React from 'react'
const SaveButton = () => {
  const { dirty, isSubmitting } = useFormikContext();
  return (
    <div className='fixed bottom-4 right-4'>
      <button type="submit" className={
        classNames({
          'btn btn-primary': true,
          'loading': isSubmitting,
        })
      } disabled={!dirty}>
        Update Post
      </button>
    </div>
  )
}

export default SaveButton123456789101112131415161718192021
Explanation:
Line 6: We use useFormikContext hook from formik to get the two pieces of state that we want. dirty and isSubmitting.
Line 12: We add a loading class if the form is being submitted.
Line 14: We disable the button if the form is not dirty. dirty means that at least one of the fields has been modified.
That's it.
This works because all our tabs are inside <Formik> provider, all the state is preserved since we're using shallow routing between tabs.
Final Output #

Conclusion #
With the combination of NextJS and Formik, we learned how to preserve "Form state" across different routes. We can navigate through the tabs safely with all our data intact.
Also, the user is able to bookmark a tab since it is saved in the browser address path. There might be some cases where this is useful for your application.
If you like this tutorial, please leave a like or share this article. For future tutorials like this, please subscribe to our newsletter or follow me on Twitter.
Resources #
Related Posts #
Credits: Image by Adam Derewecki from Pixabay


