How to Reload or Refresh a Page in NextJS 13.4 App router

Jasser Mark Arioste

Hello! In this tutorial, you'll learn how to reload a page in NextJS 13.4 /app router. When NextJS released 13.4, there were new practices to update the display or refresh the page for the user. However, there's also some confusion on how to do this so that's what we'll learn in this tutorial.
Introduction #
Refreshing or Updating the display is an important part of any application. When data is updated or mutated, the page should be refreshed.
If you have a list of todos and update a todo, the list should be updated with the latest data. To completely understand how refresh works in NextJS 13.4, we'll create a Todo App where users can create, read, edit, and delete the todos. In these mutations, we'll refresh the page using revalidatePath.
Tutorial Objectives #
- Create a NextJS 13.4 app using the
/approuter - Create a Simple Backend API with In-Memory Storage as a Database
- Learn how to refresh the page with updated data using
router.refresh
Final Output #
Step 1: Create a new NextJS Project #
First, let's create a new NextJS project by running the following command in your command line:
npx create-next-app@latest --ts --app next-js-reload-page-tutorial
The --ts option will initialize the project with Typescript and the --app option will initialize the project using the /app directory instead of the /pages directory. If you're starting a new project, I recommend using --app option.
Step 2: Implementing the Backend API #
Next, we'll implement a simple todo API with read and update functionality. First, we'll implement the route `GET /api/users/[userId]`. To do this in Next 13.4, create the file /app/users/[userId]/route.ts . route.ts is a special file convention in NextJS that allows you to create custom request handlers for a given route. Once you create the file, copy the following code:
// /app/users/[userId]/route.ts import { NextResponse } from "next/server"; // First, we define the `User` type. There are many ways to do this like using yup or zod but in this tutorial, we'll do things simply export type User = { id: string; username: string; email: string; firstName?: string; lastName: string; createdAt: Date; updatedAt?: Date; }; // define the Params Type // note that the `userId` key should match the folder /[userId]/route. type Params = { params: { userId: string }; }; // our in-memory database let users: User[] = [ { id: "1", username: "johndoe", email: "johndoe@gmail.com", firstName: "John", lastName: "Doe", createdAt: new Date(), }, { id: "2", username: "janedoe", email: "janedoe@gmail.com", firstName: "Jane", lastName: "Doe", createdAt: new Date(), }, ]; // define the get function export async function GET(req: Request, { params: { userId } }: Params) { const found = users.find((u) => u.id === userId); if (found) { return NextResponse.json(found); } return new Response("User Not found", { status: 404, }); }1234567891011121314151617181920212223242526272829303132333435363738394041424344454647484950
In line 40, we export the GET function. This is also a naming convention for the HTTP methods that you want to support for the route. First, we check the userId and see if we have it in our database then return a JSON response.
Now to test this API, you can go to http://localhost:3000/api/users/1. It should return the following:
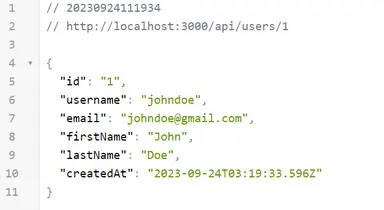
Next, let's implement the PUT method that updates one record in our database. In the same file, add the following code:
// /app/users/[userId]/route.ts //... // support PUT http method export async function PUT(req: Request, { params: { userId } }: Params) { const data = (await req.json()) as Partial<User>; //flag to check if a user is updated let updated = false; //updating the data in our in memory database users = users.map((u) => { if (u.id === userId) { updated = true; return { ...u, ...data, updatedAt: new Date(), }; } return u; }); // find and return the updated user as a JSON response const user = users.find((u) => u.id === userId); return NextResponse.json(user, { status: 200 }); }123456789101112131415161718192021222324252627
To test this method, I recommend using some kind of REST API client. If you're using VSCode, I recommend installing and using the ThunderClient extension. Once installed, there will be a new Icon on your sidebar:
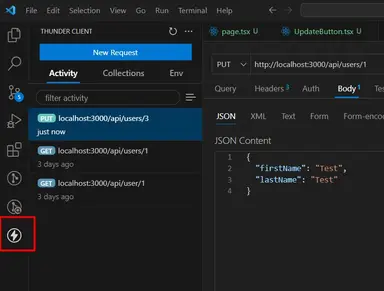
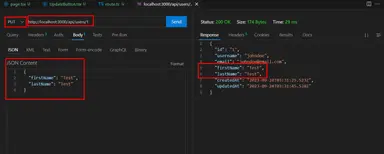
Using it is simple, first, click New Request. Modify the HTTP method to PUT, and modify the URL to localhost:3000/api/users/1. Next, add the HTTP request body by using the JSON content then click Send. You should see the updated data being returned.
Step 3: Implementing the Front-end #
In this step, we'll implement the frontend part of our application. It simulates the following scenario, read data -> update data -> refresh data.
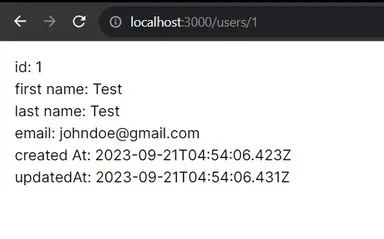
First, create the file /app/users/[userId]/page.ts and copy the following code:
// app/users/[userId]/page.ts import { User } from "@/app/api/users/[userId]/route"; //return page component and display the user data export default async function Page(params: { params: { userId: string } }) { const userId = params.params.userId; // get teh data from the users API const response = await fetch(`http://localhost:3000/api/users/${userId}`); const user = (await response.json()) as User; // display the user return ( <div className="p-4"> <p>id: {user.id}</p> <p>first name: {user.firstName}</p> <p>last name: {user.lastName}</p> <p>email: {user.email}</p> <p>created At: {user.createdAt.toString()}</p> <p>updatedAt: {user.updatedAt?.toString()}</p> </div> ); }12345678910111213141516171819202122
Here, what we're doing is using a Server Component to display the data using SSR.
Step 4: Updating and Refreshing the Page #
The next step is to update the data. To do this, we'll create a button that calls the PUT method in the backend API. Ideally, we use a <form/> element for this but for the sake of simplicity, we'll just create a button component.
Create the file, /app/users/[userId]/UpdateButton.tsx. After that, copy the following code:
// app/users/[userId]/UpdateButton.tsx "use client"; //it's important to use "use client" since we're using a client-side hook useRouter. import { useRouter } from "next/navigation"; import React from "react"; type Props = { userId: string; }; /** * Once clicked, it calls the `PUT /api/users` route to update the database using predefined data * @param param0 * @returns */ const UpdateButton = ({ userId }: Props) => { const router = useRouter(); // click handler async function updateUser(userId: string) { await fetch(`http://localhost:3000/api/users/${userId}`, { method: "PUT", body: JSON.stringify({ firstName: "Test", lastName: "Test" }), }); } return ( <div> <button // use router.refresh after updating onClick={() => updateUser(userId).then(router.refresh)} className="text-violet-400 rounded-md border-violet-400 border px-4 py-2" > Update and Refresh </button> </div> ); }; export default UpdateButton;123456789101112131415161718192021222324252627282930313233343536
Next, let's modify the page component and add this button:
import { User } from "@/app/api/users/[userId]/route"; import UpdateButton from "./UpdateButton"; export default async function Page(params: { params: { userId: string } }) { const userId = params.params.userId; // do not cache data from the fetch function using {next:{revalidate:0}. const response = await fetch(`http://localhost:3000/api/users/${userId}`, {next:{revalidate:0}}); const user = (await response.json()) as User; // display the user return ( <div className="p-4"> <p>id: {user.id}</p> <p>first name: {user.firstName}</p> <p>last name: {user.lastName}</p> <p>email: {user.email}</p> <p>created At: {user.createdAt.toString()}</p> <p>updatedAt: {user.updatedAt?.toString()}</p> <UpdateButton userId={userId} /> </div> ); }1234567891011121314151617181920212223
That's basically it!
Demo #
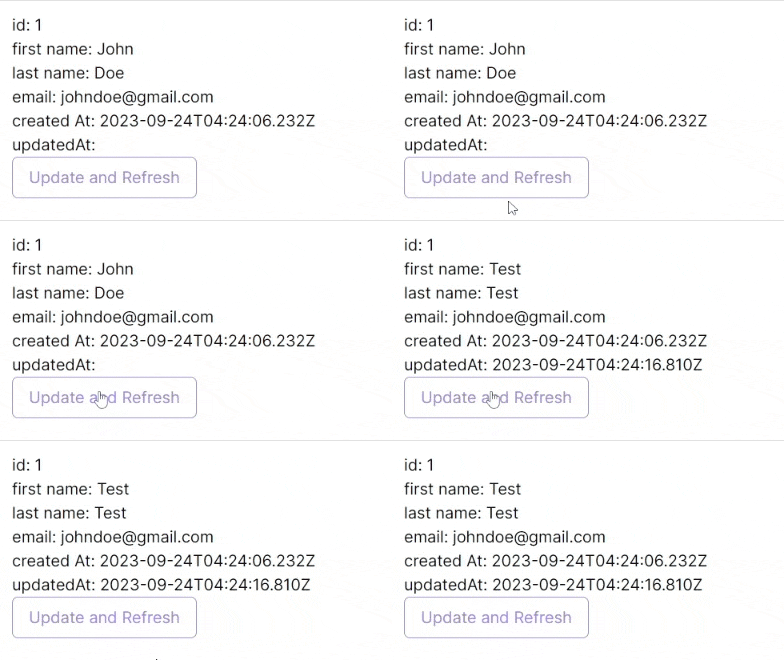
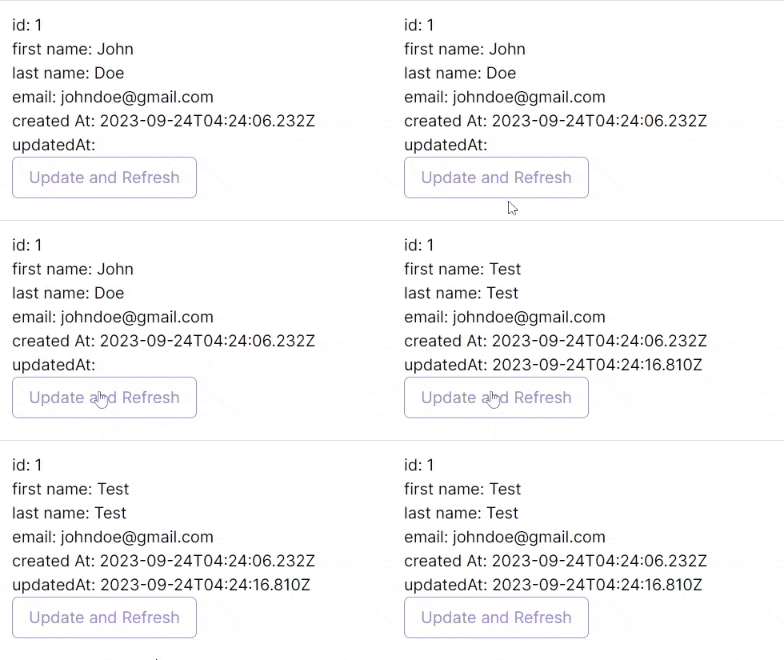
Here's the demo. Notice that the first name and last name are modified once we click Update and Refresh.
Conclusion #
You learned how to refresh the page in NextJS from the /app directory by using router.refresh method. This is more efficient than using window.location.reload since it only uses one network request.
Resources #
Credits: Image by Juan Manuel Cortés from Pixabay


