How to Implement Stripe Subscriptions in NextJS 13

Jasser Mark Arioste

Hello! In this tutorial, you'll learn how to implement stripe subscriptions in NextJS 13 by using the /app router. We'll also use a bit of Typescript for maintainability and TailwindCSS to add styling to your React components.
Introduction #
Suppose you want to build a SaaS application where you collect subscription payments from users. One of the most important things is the subscription flow, the website visitor should be able to easily checkout with minimal redirects. Ideally, a web visitor should be able to checkout, purchase a subscription plan, and then create an account. This flow is what you'll be learning in this tutorial.
Final Output #
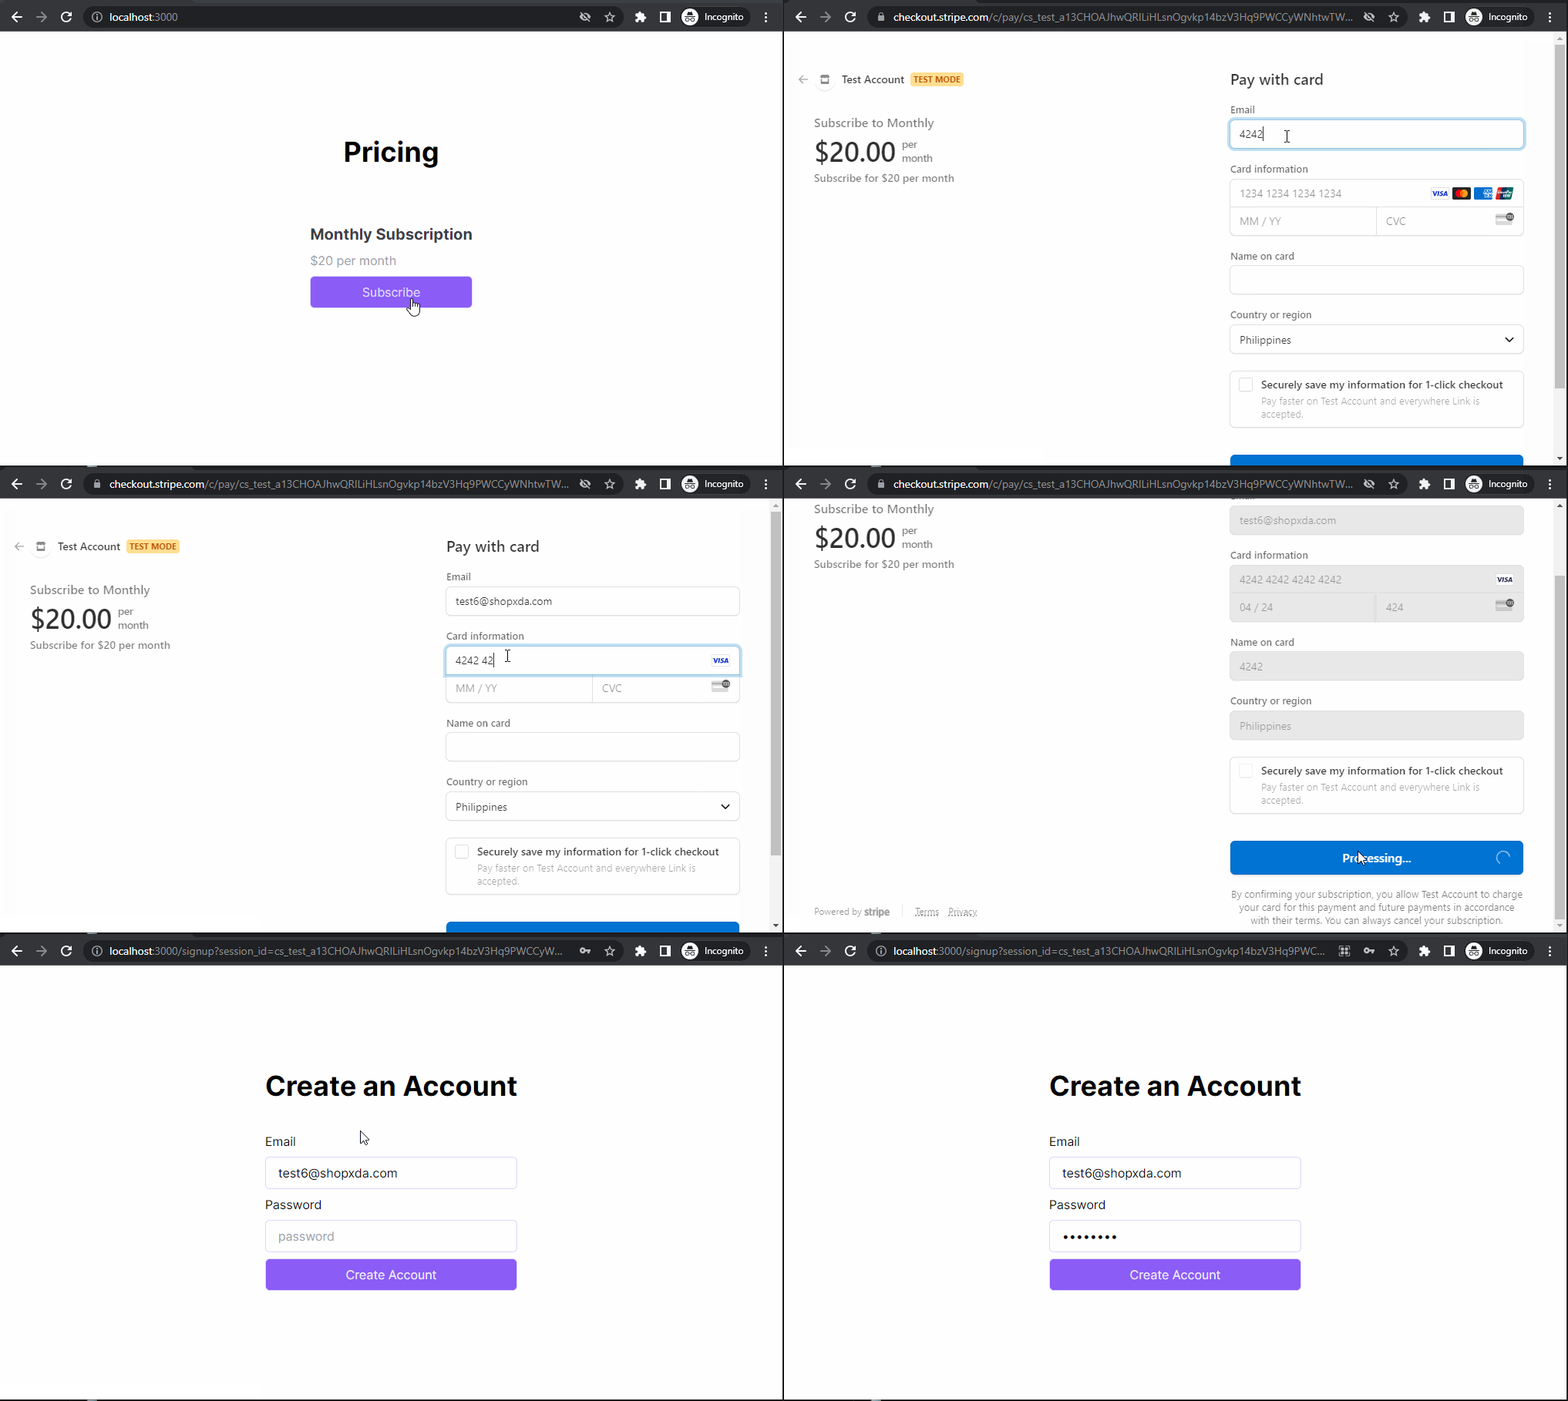
Here's the final output of what we'll be making today:

Tutorial Objectives #
Here are the things you'll be learning in this tutorial:
- Create a new Next 13 project
- Handling Stripe checkout
- Creating a checkout session for subscriptions
- Connecting checkout success to the Sign-up page
Step 0: Project Setup #
First, create a new NextJS project by running the following command:
npx create-next-app --app --ts --tailwind --use-yarn next-js-stripe-tutorialThis will create a new NextJS app with the following settings initialize: app router, typescript, tailwind, and yarn. For more information on the options used, you can run npx create-next-app --help.
Next, start the local dev server by running the following command:
cd next-js-stripe-tutorial
yarn dev
Step 1: Installing Dependencies #
Next, let's install dependencies by running the following command:
yarn add stripe @stripe/stripe-jsExplanation:
stripepackage is used for backend operations.@stripe/stripe-jspackage is used for the frontend.
Step 2: Defining Stripe Secret Keys #
I assume that you already have stripe publishable and secret keys. These keys are needed to grant the app authorization to access the stripe API. These keys usually begin with pk_/sk_ for live keys and pk_test_/sk_test_ for test mode. If you have access to your stripe dashboard, you can go to https://dashboard.stripe.com/test/apikeys to get the values of these keys.
Next, create an .env.local file in the root directory of your project and add the following environment variables:
STRIPE_SECRET_KEY="sk_test_xxxxx"
# use NEXT_PUBLIC_ prefix since we'll use this in the frontend
NEXT_PUBLIC_STRIPE_PUBLISHABLE_KEY="pk_test_xxxx"
Step 3: Creating the Checkout Session Handler #
Next, let's create the checkout session handler. First, create the file /app/checkout-sessions/route.ts. Next, copy the code below:
// app/checkout-sessions/route.ts import { stripe } from "@/lib/stripe"; import { NextResponse } from "next/server"; import Stripe from "stripe"; // data needed for checkout export interface CheckoutSubscriptionBody { plan: string; planDescription: string; amount: number; interval: "month" | "year"; customerId?: string; } export async function POST(req: Request) { const body = (await req.json()) as CheckoutSubscriptionBody; const origin = req.headers.get("origin") || "http://localhost:3000"; // if user is logged in, redirect to thank you page, otherwise redirect to signup page. const success_url = !body.customerId ? `${origin}/signup?session_id={CHECKOUT_SESSION_ID}` : `${origin}/thankyou?session_id={CHECKOUT_SESSION_ID}`; try { const session = await stripe.checkout.sessions.create({ // if user is logged in, stripe will set the email in the checkout page customer: body.customerId, mode: "subscription", // mode should be subscription line_items: [ // generate inline price and product { price_data: { currency: "usd", recurring: { interval: body.interval, }, unit_amount: body.amount, product_data: { name: body.plan, description: body.planDescription, }, }, quantity: 1, }, ], success_url: success_url, cancel_url: `${origin}/cancel?session_id={CHECKOUT_SESSION_ID}`, }); return NextResponse.json(session); } catch (error) { if (error instanceof Stripe.errors.StripeError) { const { message } = error; return NextResponse.json({ message }, { status: error.statusCode }); } } }1234567891011121314151617181920212223242526272829303132333435363738394041424344454647484950515253545556
Explanation:
Overall this creates the /checkout-sessions route which accepts a POST request. It will generate a stripe checkout session based on the data from the front end.
On lines 7-13, we define the data needed for checkout as CheckoutSubscriptionBody type. In your case, you may add more depending on what you need. But for this tutorial, this is enough data.
On lines 20-23, we define the success_url. Once the checkout is completed successfully and the payment is successful, stripe redirects to this URL. We have different URLs because if the user is a visitor, he/she needs to create an account to complete the subscription process.
On lines 25-49, we create a checkout session and return it as a JSON response to the client.
Step 4: Creating the MonthlySubscriptionCard component
#
The MonthlySubscriptionCard component is a simple card component that displays the monthly subscription price and redirects to the checkout page.
Here's what it looks like:

First, create the file components/MonthlySubscriptionCard.tsx and copy the code below:
// components/MonthlySubscriptionCard.tsx "use client"; import { CheckoutSubscriptionBody } from "@/app/checkout-sessions/route"; import { loadStripe } from "@stripe/stripe-js"; import Stripe from "stripe"; const MonthlySubscriptionCard = () => { const handleClick = async () => { // step 1: load stripe const STRIPE_PK = process.env.NEXT_PUBLIC_STRIPE_PUBLISHABLE_KEY!; const stripe = await loadStripe(STRIPE_PK); // step 2: define the data for monthly subscription const body: CheckoutSubscriptionBody = { interval: "month", amount: 2000, plan: "Monthly", planDescription: "Subscribe for $20 per month", }; // step 3: make a post fetch api call to /checkout-session handler const result = await fetch("/checkout-sessions", { method: "post", body: JSON.stringify(body, null), headers: { "content-type": "application/json", }, }); // step 4: get the data and redirect to checkout using the sessionId const data = (await result.json()) as Stripe.Checkout.Session; const sessionId = data.id!; stripe?.redirectToCheckout({ sessionId }); }; // render a simple card return ( <div className="border border-gray-100 rounded-md p-8 flex flex-col gap-2 items-start"> <h2 className="text-xl font-bold text-gray-700">Monthly Subscription</h2> <p className="text-gray-400">$20 per month</p> <button onClick={() => handleClick()} className="border border-violet-200 text-violet-500 rounded-md px-4 py-2 w-full hover:bg-violet-500 hover:text-violet-200 transition-colors" > Subscribe </button> </div> ); }; export default MonthlySubscriptionCard;1234567891011121314151617181920212223242526272829303132333435363738394041424344454647484950
Step 5: Creating the Pricing page #
The pricing page is usually where all the subscription plans are lined up and the user can select which plan is best for him/her. For the pricing page, we'll just use the home page route. Modify the file /app/page.tsx to the following.
// app/page.tsx import MonthlySubscriptionCard from "@/components/MonthlySubscriptionCard"; export default function Home() { return ( <main className="flex min-h-screen flex-col items-center justify-between p-24"> <div> <h1 className="text-center text-4xl font-bold my-10">Pricing </h1> <MonthlySubscriptionCard /> </div> </main> ); }12345678910111213
Here's the output after this step:

Step 6: Creating the SignUpPage and SignUpForm #
If the user is a visitor and once checkout is completed, we need to redirect the user to the signup page. First, create the file /app/signup/page.tsx and copy the code below:
import { stripe } from "@/lib/stripe"; import Stripe from "stripe"; import SignUpForm from "./SignUpForm"; type Props = { params: any; searchParams: { [key: string]: string | string[] | undefined; session_id?: string; }; }; async function getCustomerbySession(sessionId?: string) { if (!sessionId) return null; const session = await stripe.checkout.sessions.retrieve(sessionId); if (!session.customer) return null; const customer = await stripe.customers.retrieve(session.customer as string); return customer as Stripe.Customer; } export default async function SignUpPage(props: Props) { const searchParams = props.searchParams; const sessionId = searchParams.session_id; const customer = await getCustomerbySession(sessionId); return ( <div className="flex min-h-screen flex-col items-center justify-between p-24"> <div> <h1 className="text-center text-4xl font-bold my-10"> Create an Account </h1> <SignUpForm email={customer?.email ?? ""} customerId={customer?.id} /> </div> </div> ); }123456789101112131415161718192021222324252627282930313233343536
Explanation:
This component is a server component that gets the customer information based on the session_id. Remember that on /checkout-sessions/route.ts line 21, we defined the success URL as such.
If there's customer information such as email and customerId, we pass it to the SignUpForm component.
Next, let's create the SignUpForm component. Create the file /app/signup/SignUpForm.tsx and copy the code below.
"use client"; type Props = { email?: string; customerId?: string; }; const SignUpForm = ({ email, customerId }: Props) => { return ( <form className="flex flex-col gap-2" onSubmit={(e) => { e.preventDefault(); // save user along with subscription information the database }} > <label>Email</label> <input className="border border-violet-200 rounded-md px-4 py-2 w-full" type="text" value={email} placeholder="Email" name="email" id="email" disabled={!!email} /> <input type="hidden" value={customerId} name="stripe_customer_id" /> <label htmlFor="password">Password</label> <input className="border border-violet-200 rounded-md px-4 py-2 w-full" type="password" name="password" id="password" placeholder="password" ></input> <button className="border border-violet-200 text-violet-100 bg-violet-500 rounded-md px-4 py-2 w-full hover:bg-violet-700 hover:text-violet-100 transition-colors" type="submit" > Create Account </button> </form> ); }; export default SignUpForm;123456789101112131415161718192021222324252627282930313233343536373839404142434445
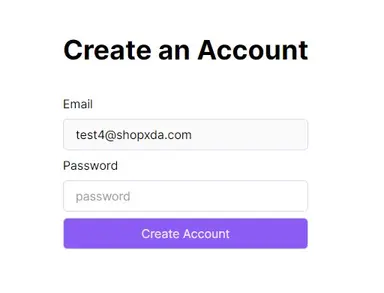
After this step, you should have a similar output below. If the user just finished checkout, it fills in the email field and will be disabled. We'll show this in the demo later.
In addition, there's also a hidden field customerId so that we'll know the user's customerId on stripe.

That's basically it!
After saving the user's account to the database, the user should be able to log in and use his/her subscription. This will be your assignment for this tutorial.
Full Code #
The full code can be accessed at Github: jmarioste/next-js-stripe-tutorial.
Conclusion #
You learned how to integrate stripe subscriptions in a Next13 application with the app router.
If you like this tutorial, please leave a like or share this article. For future tutorials like this, please subscribe to our newsletter or follow me on GitHub.
Resources #
Credits: Image by Dirkek from Pixabay


