How to Set Up NextJS and TailwindCSS in 2023

Jasser Mark Arioste

In this tutorial, you'll learn how to set up NextJS 13 and TailwindCSS in 2023. We'll set it up from scratch for pages and app directories, and use an existing template to speed up installation.
Setting up TailwindCSS in Existing NextJS Projects #
To set up tailwind in existing NextJS Projects, you'll have to first install the dependencies. Do so by running the command:
yarn add -D tailwindcss postcss autoprefixer1
Next, is to initialize tailwind using the command:
npx tailwindcss init -p1
This will create two files, tailwind.config.js and postcss.config.js.
The postcss.config.js file will be used by NextJS internally to process the .jsx/.tsx files. Most likely, you won't need to modify this file but if you have other PostCSS processes, learn about them on the NextJS documentation.
Next, we'll modify the tailwind.config.js so that it will know where to the source files are. Copy the code below and paste it on tailiwind.config.js:
/** @type {import('tailwindcss').Config} */
module.exports = {
  content: [
    "./app/**/*.{js,ts,jsx,tsx}",
    "./pages/**/*.{js,ts,jsx,tsx}",
    "./components/**/*.{js,ts,jsx,tsx}",

    // Or if using `src` directory:
    "./src/**/*.{js,ts,jsx,tsx}",
  ],
  theme: {
    extend: {},
  },
  plugins: [],
}123456789101112131415
This will tell Tailwind where to look for the classes so that these classes will be included in the final CSS bundle.
Next is to add the TailwindCSS directives in our styles/global.css file:
// styles/globals.css
@tailwind base;
@tailwind components;
@tailwind utilities;1234
You can now use TailwindCSS classes in your NextJS project like so:
// pages/index.tsx export default function Home() { return ( <> <main className="container mx-auto max-w-4xl"> <h1 className="my-10 text-2xl"> Welcome to NextJS + TailwindCSS Starter </h1> </main> </> ); }123456789101112
Running your app using yarn dev, it will look like this:

Using a Tailwind-NextJS Starter Template #
If you're starting a new project and you already know to install it manually, you can use existing NextJS templates to speed up the process. I actually created a GitHub repo just for this purpose. Now you can simply run the command below to get started:
npx create-next-app -e https://github.com/jmarioste/next-tailwind-2023Here we use the -e option in create-next-app which stands for example. It accepts a public GitHub repo as a parameter.
Once it's done installing everything you can simply run yarn dev to start the local server.
Extra Tips #
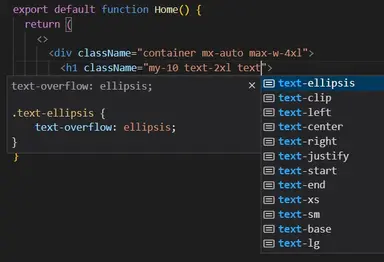
If you're using VSCode, don't forget to install the TailwindCSS VSCode extension to receive intellisense for the tailwind classes:

This will provide intellisense and documentation which rapidly increase the development time:

Conclusion #
We learned how to install TailwindCSS in NextJS. We also installed TailwindCSS VSCode extension which helps a ton so that we have fewer typos in our code.
If you like this tutorial, please leave a like or share this article. For future tutorials like this, please subscribe to our newsletter or follow me on Twitter.
Credits: Image by Lars Nissen from Pixabay


