Full Tutorial: How to Speed Up your NextJS App with Preact

Jasser Mark Arioste

Nothing beats speed. If you have a nextjs blog or website, you would want to speed it up by reducing your bundle size. One way to drastically reduce the bundle size of your nextjs app is by replacing react with Preact.
Preact is a fast 3kb alternative to react with the same modern API. Preact produces a small footprint by using the browser's native addEventListenerfor event handling. Preact does not include React's synthetic events which takes up the bulk of React's bundle size.
Do note that some features in React 18 are still not officially supported by Preact. Preact is always behind when react releases new features.
Introduction #
In this tutorial, we'll be using next-plugin-preact package. This is the official NextJS plugin made by the preact maintainers.
By using this package, we will be using preact for both development and production environments. I do not recommend using different packages for development and production. There might be some react packages with compatibility errors with preact. We'll talk more on this later.
With that out of the way, let's start!
Install Preact Dependencies #
Let's install the dependencies required by the plugin.
yarn add next-plugin-preact preact react@npm:@preact/compat react-dom@npm:@preact/compat react-ssr-prepass@npm:preact-ssr-prepass preact-render-to-string1
This step also modified our package.json slightly:
"dependencies": {
     ...
    "react": "npm:@preact/compat",
    "react-dom": "npm:@preact/compat"
}12345
NOTE: At the time of writing, Next v13 requires React 18. Preact still does not support all features of React 18. For now, the best way is to limit our NextJS version to 12.3.1
yarn add next@12.3.11
Modifying NextJS Config #
Let's modify our nextjs config to use next-plugin-preact package. This will handle all the compatibility issues between react and preact.
const withPreact = require('next-plugin-preact');

module.exports = withPreact({
    /* regular next.js config options here */
});12345
Comparing the builds #
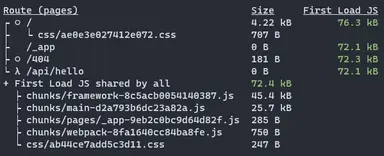
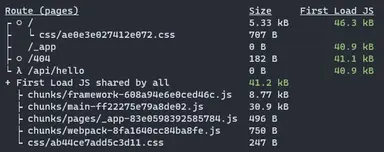
Let's compare the build with and without preact.
Build without Preact

Build with Preact

Amazing! A 30kb+ reduction in bundle size.
Fixing Errors #
I want to address the errors I experienced when switching to preact. I used some third-party packages like@headlessui/react and it gave me some errors.
Let's fix it!
Error: Hook can only be invoked from render methods.
If you are using some other third-party package, you'll probably encounter this error at some point. This issue occurs because NextJS mixes CJS with ESM bundles generated by webpack which loads two copies of Preact. React is fine because it only supports CJS.
To fix this error we just have to modify the next.config.js and disable esmExternals option. By disabling esmExternals, nextjs will only import CJS modules.
const withPreact = require('next-plugin-preact');

module.exports = withPreact({
  //add this option
  experimental: {
    esmExternals: false,
  },
});12345678
Cannot read property '__H' of undefined
The fix for this is exactly the same as above and set esmExternals to false.
Installing Preact Dev Tools #
One last thing, don't forget to install preact dev tools to debug your nextJS app. Follow the guide in preact debugging docs for more info
That's it! 🎃 #
Thank you for reaching this far! We've successfully speed up our nextjs app by replacing react with preact. We were also able to deal with the errors that came with switching to preact.
If you like tutorials like this, please leave a like or share. You may subscribe to our newsletter or follow me on twitter, for new tutorials in the future.
Resources #
Preact Docs - https://preactjs.com/guide/v10/getting-started
React Docs - https://reactjs.org/docs/getting-started.html
Next Preact Plugin - https://github.com/preactjs/next-plugin-preact
Credits - Image by Enrique from Pixabay


