NextJS How to Redirect After Login

Jasser Mark Arioste

Hello, hustlers! In this tutorial, you'll learn how to redirect the user after signing in using NextJS and NextAuth.js. We're going to start from scratch to cover everything you need to know about the best practices.
The Problem #
I'm assuming the following requirements:
- Protected pages in your application redirect to the login page if the user is not logged in.
- After logging in, you redirect the user back to the protected page.
- You're using the
next-authpackage as the authentication solution - You're using a custom login page
It can be pretty tricky if not implemented correctly.
The Solution #
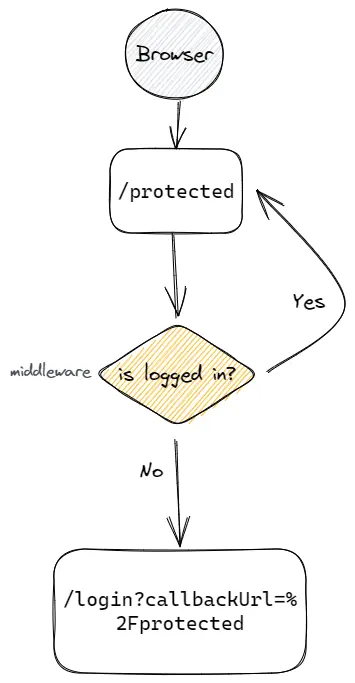
We set the protected routes in middleware.ts. If the current path matches a protected route, we then check if a user is not logged in. If not logged in, we redirect the user to the login page.
We also add a callbackUrl query parameter to the URL when redirecting to the login page. After login, we redirect back to the callbackUrl.

I know that this is too vague for now, so let's proceed to the actual implementation.
Project Setup #
All right, let's start by creating a new NextJS Project:
npx create-next-app --ts next-redirect-after-login1
After setup, install next-auth package:
# yarn
yarn add next-auth

#npm
npm i next-auth12345
Creating the NextAuth handlers #
Next, let's setup next-auth handlers by creating the file pages/api/auth/[...nextauth].ts. And create a simple credentials provider for login:
// [...nextauth].ts import CredentialsProvider from "next-auth/providers/credentials"; import NextAuth from "next-auth"; if (!process.env.NEXTAUTH_SECRET) { throw new Error( "please provide process.env.NEXTAUTH_SECRET environment variable" ); } export default NextAuth({ providers: [ CredentialsProvider({ name: "credentials", id: "credentials", credentials: { email: { label: "email", type: "text" }, password: { label: "password", type: "password" }, }, async authorize(credentials) { if ( credentials?.email !== "admin@example.com" || credentials.password !== "@Password123" ) { throw new Error("Invalid email or password"); } return { email: "admin@example.com", name: "Admin", id: "test-id", }; }, }), ], session: { strategy: "jwt", }, pages: { signIn: "/login", }, });123456789101112131415161718192021222324252627282930313233343536373839
Things to note:
- We are using the NEXTAUTH_SECRET environment variable. It is the default environment variable that
next-authuses to encrypt the JWT and hash the email verification tokens. - We use the
CredentialsProviderso that we can provide a test user - We use
jwtstrategy so that we don't have to use a database to store the session - We use a customized login page using the
/loginroute.
Next, create a .env.development file and add the NEXTAUTH_SECRET:
NEXTAUTH_SECRET="mysupersecret"1
Creating the Login Page #
Next, let's create a file pages/login.tsx for the custom login page. In production apps, they always use a custom login page rather than relying on the default login page provided by next-auth.
import { signIn } from "next-auth/react"; import { useRouter } from "next/router"; import React, { useState } from "react"; const LoginPage = () => { const [error, setError] = useState(""); const router = useRouter(); const callbackUrl = (router.query?.callbackUrl as string) ?? "/"; const handleSubmit = async ( e: React.FormEvent<HTMLFormElement> ): Promise<void> => { e.preventDefault(); const _target = e.target as any; const email = _target.email.value; const password = _target.password.value; const result = await signIn("credentials", { email, password, redirect: false, }); if (result?.error) { setError(result.error); } else { router.push(callbackUrl); } }; return ( <form onSubmit={handleSubmit}> <h1>Sign In</h1> {!!error && <p>{error}</p>} <input type="text" placeholder="email" name="email" /> <input type="password" placeholder="password" name="password" /> <button type="submit">Sign In</button> </form> ); }; export default LoginPage;123456789101112131415161718192021222324252627282930313233343536
Explanation:
Line 7: We check if there's a callbackUrl query parameter, otherwise we default the redirect to the home page.
Line 15: Use the signIn function provided by next-auth using the credentials provider.
Line 18: Set redirect option to false. We don't want to redirect to the default nextauth error page if there's an error. We want to show the error above the login form.
Line 21: We set the error state if there's an error
Line 23: We redirect to the callbackUrl using router.push
Creating the Middleware function #
Next, let's wire everything together by creating a middleware function. Create a file middleware.ts in the root directory of your project.
// middleware.ts import { getToken } from "next-auth/jwt"; import { NextRequest, NextResponse } from "next/server"; export async function middleware(req: NextRequest) { const pathname = req.nextUrl.pathname; const protectedPaths = ["/", "/admin"]; const isPathProtected = protectedPaths?.some((path) => pathname == path); const res = NextResponse.next(); if (isPathProtected) { const token = await getToken({ req }); if (!token) { const url = new URL(`/login`, req.url); url.searchParams.set("callbackUrl", pathname); return NextResponse.redirect(url); } } return res; }123456789101112131415161718
Explanation:
Line 5: We define the protected paths of our app.
Line 6: We check if the current path is a protected path.
Line 9: If the path is protected, we use the getToken function from next-auth to check if the user is not logged in. We don't have to pass the secret option since next-auth uses the NEXTAUTH_SECRET environment variable that we defined earlier.
Lines 10-13: If the user is not logged in (i.e., there is no token), redirect the user to the login page but set a callbackUrl using the current path to the query params.
This example is made using one middleware function. If you need to stack multiple middleware functions, see my previous post: How to Chain Multiple Middleware Functions in NextJS.
That's it!
Conclusion #
We learned how to redirect after logging in by adding the callbackUrl param in the URL. The callbackUrl parameter is used by the login page component to redirect to the previous page after logging in.
If you like this tutorial, please leave a like or share this article. For future tutorials like this, please subscribe to our newsletter or follow me on Twitter.


