How to Setup Role-Based Authentication in NextJS + NextAuth.js

Jasser Mark Arioste

Hello, hustler! In this tutorial, you will learn the best practices for setting up role-based authentication/authorization on NextJS with NextAuth.js and Typescript.
There are many tutorials out there that check the role from the client-side / browser. In my experience, this leads to weird usability issues.
Since the addition of middleware in NextJS 12.2, we can now check for the user properties in the server. This makes it easier to grant or remove access for static pages since we don't have to check it from the client-side.
You'll learn how to set up a middleware that checks for the user role. Once the role is checked, you can use redirect or rewrite to show the appropriate page to the user.
Ready? Let's start!
The Problem #
We'll have an /admin route that only allows access to admin users. If the user is not logged in it should redirect to the /login route. If the user logged in but is not an admin, it should show the /403 page.
Step 0: Project Setup #
First, let's create a new NextJS Project (with Typescript) by running the command:
npx create-next-app --ts role-based-auth1
Once everything is installed, let's start a local server at http://localhost:3000 by running the command:
cd role-based-auth && yarn dev1
Modifying tsconfig.json
Add the following setting to your tsconfig.json to enable absolute imports for a cleaner code.
{
  // ...other options
  "baseUrl": "."
}1234
Setting up the Users Data and Services
To shorten this tutorial, we'll be using a local file to act as our database. Create a file data/users.json and copy-paste the following contents.
[
  {
    "email": "admin@example.com",
    "password": "@Password123",
    "name": "Test Admin",
    "role": "admin",
    "id": "001"
  },
  {
    "email": "user@example.com",
    "password": "@Password123",
    "name": "Test User",
    "role": "user",
    "id": "002"
  }
]12345678910111213141516
These are two user accounts that we'll be using for login. Notice that they have role properties of user and admin.
Next, let's create an interface that allows us to access our file database. First, we'll create the interface. Create a file services/IUserService.ts:
// services/IUserService.ts import { User } from "next-auth"; export interface IUserService { signInCredentials(email: string, password: string): Promise<User> | User; }12345
Next, let's create the concrete class that implements the IUserService interface. Create a file services/UserService.ts:
// services/UserService.ts
import users from "data/users.json";
import { User } from "next-auth";
import { IUserService } from "./IUserService";
export class InMemoryUserService implements IUserService {
  signInCredentials(email: string, password: string): User | Promise<User> {
    const user = users.find((user) => {
      const emailFound = email === user.email;
      const isPasswordCorrect = password === user.password;
      const userFound = emailFound && isPasswordCorrect;
      return userFound;
    }) as User;
    if (!user) {
      throw new Error("Invalid email or password");
    }
    return user;
  }
}

export const userService = new InMemoryUserService();1234567891011121314151617181920
Explanation:
Line 2: We import our file database to check later when logging in.
Line 6: We implement the function signInCredentials that accepts email and password and returns a User.
Line 7-12: We check our database if there's a User that matches the email and password and return it. If there's no user we throw an error.
Step 1: Augmenting the User Object Definition #
To access the role property of our user from anywhere in your application, you have to augment the Session and JWT interface from "next-auth" and "next-auth/jwt" packages. I go a bit more in-depth about this in my previous tutorial: How to Extend User and Session in NextAuth.js
Create a file nextauth.d.ts at the root directory of your project.
// nextauth.d.ts import { DefaultSession, DefaultUser } from "next-auth"; // Define a role enum export enum Role { user = "user", admin = "admin", } // common interface for JWT and Session interface IUser extends DefaultUser { role?: Role; } declare module "next-auth" { interface User extends IUser {} interface Session { user?: User; } } declare module "next-auth/jwt" { interface JWT extends IUser {} }1234567891011121314151617181920
Step 2: Setting up next-auth handler
#
Next, we'll set up the next-auth handler to add the role property to the session.user and token.
Create the file pages/api/auth/[...nextauth].ts. Let's add the imports and some guard that checks for the NEXTAUTH_SECRET environment variable:
import { NextApiRequest, NextApiResponse } from "next";
import CredentialsProvider from "next-auth/providers/credentials";
import NextAuth from "next-auth";
import { userService } from "services/UserService";
if (!process.env.NEXTAUTH_SECRET) {
  throw new Error("Please provide process.env.NEXTAUTH_SECRET");
}1234567
NEXTAUTH_SECRET is an environment variable that next-auth automatically detects and uses for the secret configuration for the JWT. make sure you create an .env.development file and define the NEXTAUTH_SECRET variable there:
// .env.development
NEXTAUTH_SECRET=mysecret1231
Next, let's add a CredentialsProvider:
...
export default NextAuth({
  providers: [
    CredentialsProvider({
      name: "Credentials",
      id: "credentials",
      credentials: {
        email: { label: "Email", type: "text" },
        password: { label: "Password", type: "password" },
      },
      async authorize(credentials) {
        if (!credentials) {
          throw new Error("No credentials.");
        }
        const { email, password } = credentials;
        return userService.signInCredentials(email, password);
      },
    }),
  ],
})1234567891011121314151617181920
We use our userService from earlier to check if there's a user that matches the credentials.
Next, let's add a custom sign-in page:
...
export default NextAuth({
  providers: [
     ...
  ],
  pages: {
    signIn: "/signin",
  },
})123456789
Next, configure the jwt and session callbacks to set the role for the token and session.user.
...
export default NextAuth({
  providers: [
     ...
  ],
  ...
  callbacks: {
    async jwt({ token, user }) {
      /* Step 1: update the token based on the user object */
      if (user) {
        token.role = user.role;
      }
      return token;
    },
    session({ session, token }) {
      /* Step 2: update the session.user based on the token object */
      if (token && session.user) {
        session.user.role = token.role;
      }
      return session;
    },
  },
})1234567891011121314151617181920212223
Notice that we can access the role property here without any error. This is due to augmenting the User definition from Step 1.
Step 3: Creating the Admin Page #
First, I'd like to use tailwind and daisyUI for styling. This step is optional and you can skip this step or use another styling library. Let's install the dependencies and initialize a tailwind config:
yarn add -D tailwindcss postcss autoprefixer daisyui && npx tailwindcss init -p1
Modify the tailwind.config.js:
// tailwind.config.js /** @type {import('tailwindcss').Config} */ module.exports = { content: [ "./app/**/*.{js,ts,jsx,tsx}", "./pages/**/*.{js,ts,jsx,tsx}", "./components/**/*.{js,ts,jsx,tsx}", ], daisyui: { themes: ["light"], }, theme: { container: { center: true, padding: { DEFAULT: "1rem", }, }, extend: {}, }, plugins: [require("daisyui")], };12345678910111213141516171819202122
Add tailwind in styles/globals.css:
# styles/globals.css
@tailwind base;
@tailwind components;
@tailwind utilities;
# you may replace everything with just these three lines.12345
You're all set for the styling.
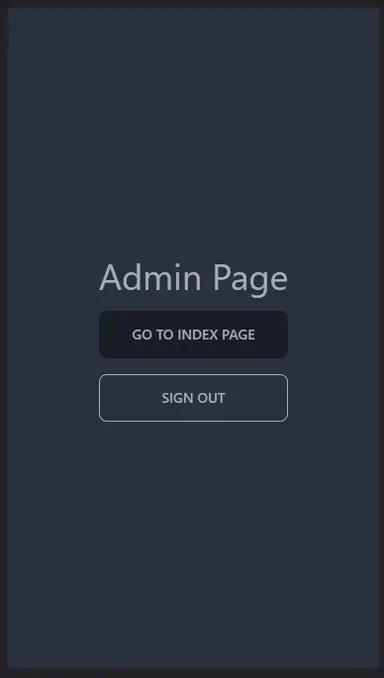
Next, let's create a simple AdminPage component and create the file pages/admin.tsx:
// pages/admin.tsx import Link from "next/link"; import React from "react"; import { signOut } from "next-auth/react"; const AdminPage = () => { return ( <div className="container"> <div className="grid place-content-center min-h-screen"> <div className="flex flex-col gap-4"> <h1 className="text-4xl">Admin Page</h1> <Link className="btn btn-primary" href="/"> Go to Index Page </Link> <button className="btn btn-accent btn-outline" onClick={() => signOut()} > Sign Out </button> </div> </div> </div> ); }; export default AdminPage;12345678910111213141516171819202122232425262728
This is all we need for the admin page. We don't have to check the access logic using react. In fact, I don't recommend this since it causes a slight delay. The access logic will be added later inside the middleware.
If you navigate to /admin, you should have something like this, any user can freely access it at this point:

Step 5: Creating the 403 Page #
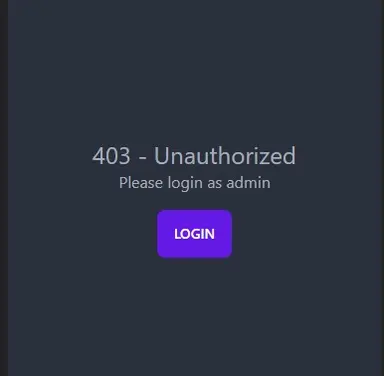
Next, let's create the /403 page. We'll show this page if a logged-in user is not authorized to view a protected page. Create the file pages/403.tsx:
// pages/403.tsx import { NextPage } from "next"; import Link from "next/link"; import React from "react"; const Custom403: NextPage = () => { return ( <div className="container"> <div className="grid place-content-center min-h-screen"> <div className="flex flex-col items-center"> <div className="my-4 text-center"> <h1 className="text-2xl">403 - Unauthorized</h1> <p className="">Please login as admin</p> </div> <Link className="btn btn-primary" href="/signin"> Login </Link> </div> </div> </div> ); }; export default Custom403;1234567891011121314151617181920212223
Navigate to /403 and you should have something like this:

Step 4: Creating a Custom Sign-in Page #
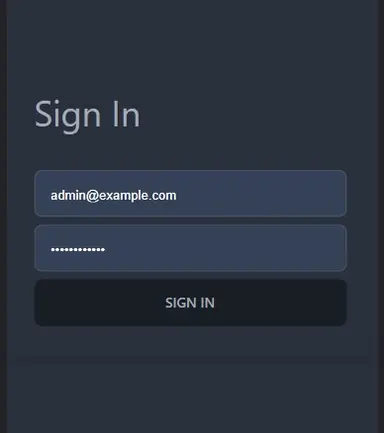
Next, let's create a custom sign-in page. Create the file pages/signin.tsx:
import { signIn } from "next-auth/react"; import { useRouter } from "next/router"; import React, { useState } from "react"; const SignInPage = () => { const [email, setEmail] = useState(""); const [password, setPassword] = useState(""); const [error, setError] = useState(""); const router = useRouter(); const callbackUrl = decodeURI((router.query?.callbackUrl as string) ?? "/"); const handleSubmit = async ( e: React.FormEvent<HTMLFormElement> ): Promise<void> => { e.preventDefault(); const result = await signIn("credentials", { email, password, callbackUrl: callbackUrl ?? "/", redirect: false, }); if (result?.error) { setError(result.error); } if (result?.ok) { router.push(callbackUrl); } }; return ( <div className="container"> <div className="flex items-center justify-center min-h-screen"> <div className="flex flex-col items-center card shadow-md"> <form className="card-body w-96" onSubmit={handleSubmit}> <h1 className="text-4xl my-8">Sign In</h1> {!!error && <p className="text-error">ERROR: {error}</p>} <input type="text" className="input input-bordered" placeholder="email" value={email} onChange={(e) => { setEmail(e.target.value); }} /> <input type="password" className="input input-bordered" placeholder="password" value={password} onChange={(e) => { setPassword(e.target.value); }} /> <button className="btn" type="submit"> Sign In </button> </form> </div> </div> </div> ); }; export default SignInPage;123456789101112131415161718192021222324252627282930313233343536373839404142434445464748495051525354555657585960616263
After this step you should have a simple sign-in page like this:

Step 6: Adding a middleware #
Next, let's add a middleware to handle access to our admin page or any other protected pages. Create the file middleware.ts in the root directory of your project. Note that this is a very simple middleware implementation, if you need to chain multiple middleware functions, take a look at my previous tutorial: How to Chain Multiple Middleware Functions in NextJS
// middleware.ts
import { getToken } from "next-auth/jwt";
import { NextFetchEvent, NextRequest, NextResponse } from "next/server";
export async function middleware(request: NextRequest, _next: NextFetchEvent) {
  const { pathname } = request.nextUrl;
  const protectedPaths = ["/admin"];
  const matchesProtectedPath = protectedPaths.some((path) =>
    pathname.startsWith(path)
  );
  if (matchesProtectedPath) {
    const token = await getToken({ req: request });
    if (!token) {
      const url = new URL(`/signin`, request.url);
      url.searchParams.set("callbackUrl", encodeURI(request.url));
      return NextResponse.redirect(url);
    }
    if (token.role !== "admin") {
      const url = new URL(`/403`, request.url);
      return NextResponse.rewrite(url);
    }
  }
  return NextResponse.next();
}1234567891011121314151617181920212223
I'm aware that next-auth has a middleware function, but I like full control over the code.
Explanation:
Line 5: We define the protected paths of our application.
Line 6-9: We check if the current path matches at least one of our protected paths.
Line 11: We use getToken to check if there's a logged-in user.
Line 12-16: If there is no token/user, we redirect the user to the sign-in page.
Line 17-20: We check if the role and if the user is not an admin, we use NextResponse.rewrite to show the /403 page.
That's it!
For admin user, you can use these credentials: admin@example.com / @Password123
For regular user credentials: user@example.com / @Password123
Conclusion #
We learned how to implement a role-based authentication using NextJS. We used a middleware function to secure the protected pages of our application. We were able to keep our components clean, without any dependencies from other components.
If you like this tutorial, please leave a like or share this article. For future tutorials like this, please subscribe to our newsletter or follow me on Twitter.
Resources #
Credits: Image by Julius Silver from Pixabay


