How to Submit NextJS Form to API using FormData (Typescript)

Jasser Mark Arioste

Hello, hustler! In this tutorial, you'll learn how to submit form data to an API in NextJS.
Usually, when building complicated forms like Checkout or Registration steps, I recommend using a form state management library like Formik or react-hook-form. It would be easier to handle errors and validation.
But we don't need these libraries every time. Maybe we just have a simple form that uploads an image to a backend API. In this tutorial, we'll learn different ways to submit the form in NextJS.
Objectives of this tutorial #
- Create an API to handle
FormDatain NextJS with Typescript - Learn how to submit a form using
FormDatawithout any React state. - Learn how to submit a form using
FormDatawith React state. - What's the best approach?
Creating an API to Handle FormData
#
There are two formats of content-type for form data: application/x-www-form-urlencoded and multipart/form-data. Note that for this tutorial we're using the content-type application/x-www-form-urlencoded which can be immediately parsed by NextJS in the API handler.
For multipart/form-data, this is usually used when you submit or upload files to a server. And you need to modify the API handler for NextJS to disable the bodyParser and it's not included in the scope of this tutorial.
Suppose we have a simple form that accepts the email from website visitors. It only has one field which is email. Let's create an API handler by first creating the file pages/api/subscribe.ts
// pages/api/subscribe.ts // we modify the NextApiRequest to what data we expect. // NextJS automatically parses the data and gives us a javascript object using the body property. interface SubscribeRequest extends NextApiRequest { body: { email?: string; }; } export default function handler(req: SubscribeRequest, res: NextApiResponse) { if (req.method !== "POST") { res.status(405).send("Method not allowed"); return; } const email = req.body.email; //do something with the email console.log(`Saving ${email} is saved to the subscribers table`); return res.redirect("/subscribe?success=true").toString(); }123456789101112131415161718
Explanation:
- First, we define the
bodyof the request by extendingNextApiRequest - In lines 11-14, We add a guard only allowing the POST method.
- On line 18, once we're done with the email, we redirect to the
/subscribepage and add a query parametersuccess=trueto indicate that the email submission is successful.
Example 1 - Submitting a Form Without React State #
Next, let's create a simple form that accepts an email from a website visitor. Since the form is so simple, we don't need to use libraries like Formik here.
// pages/subscribe.tsx import React from "react"; const SubscribePage = () => { return ( <div className="container mx-auto"> <h1>Sign up to our newsletter!</h1> <form method="POST" action="/api/subscribe"> <input placeholder="Enter your email" name="email" /> <button type="submit">Sign Up</button> </form> </div> ); }; export default SubscribePage;1234567891011121314
Explanation:
There are a few things to note here:
- It does not have any client-side validation but does not use form-state management libraries like Formik. The advantage of this the bundle size for this page is small.
- Line 7, we use the
POSTmethod to send the data to the/api/subscribeendpoint automatically. - Line 8, we use input with the
name="email"attribute. This would directly translate to thereq.body.emailonapi/subscribe.ts.
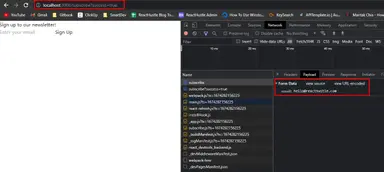
After you click submit, this will navigate to /api/subscribe then redirect back to /subscribe. When we check the network logs we can see that the form data is submitted.

We submitted the form using only a pure HTML solution to reduce bundle size. But it depends on the API implementation as well. If it doesn't redirect back to the page, we must focus on the client-side to display information.
That's what we'll show in the next example
Example 2 - Submitting a Form with React State #
What if the API doesn't redirect back to the page, like the implementation below? It only returns a json object.
// pages/api/subscribe.ts import type { NextApiRequest, NextApiResponse } from "next"; interface SubscribeRequest extends NextApiRequest { body: { email: string; }; } export default function handler(req: SubscribeRequest, res: NextApiResponse) { if (req.method !== "POST") { res.status(405).send("Method not allowed"); return; } const email = req.body.email; console.log(`Saving ${email} is saved to the subscribers table`); return res.status(200).json({ success: true }); }12345678910111213141516
For this, we can use states in react to handle the data and use e.preventDefault() function to disallow the automatic submission.
// pages/subscribe.tsx import React, { useState } from "react"; const SubscribePage = () => { // 👇track form state const [email, setEmail] = useState(""); // 👇state to show the result after submitting const [result, setResult] = useState<any>(); // 👇 submit handler const handleSubmit = async ( e: React.FormEvent<HTMLFormElement> ): Promise<void> => { e.preventDefault(); // 👇 encode the data to application/x-www-form-urlencoded type const formData = new URLSearchParams(); formData.append("email", email); // 👇 call backend endpoint using fetch API fetch("/api/subscribe", { body: formData.toString(), method: "post", headers: { "content-type": "application/x-www-form-urlencoded", }, }).then(async (result) => { // 👇 modify the state to show the result setResult(await result.json()); }); }; return ( <div className="container mx-auto"> <h1>Sign up to our newsletter!</h1> {/* 👇 wire-up the handleSubmit handler */} <form onSubmit={handleSubmit}> <input placeholder="Enter your email" name="email" // 👇 wire-up the controlled state value={email} onChange={(e) => setEmail(e.target.value)} /> <button type="submit">Sign Up</button> </form> {/* show the data returned by the api */} Result <pre>{JSON.stringify(result, null, 4)}</pre> </div> ); }; export default SubscribePage;12345678910111213141516171819202122232425262728293031323334353637383940414243444546474849
Although it's a bit more verbose than the first example, it's faster because it doesn't use redirects. It also allows us to fully control the client side, and what message we display to the user.
Explanation:
Lines 4-7: We define some states to be used in our application.
Lines 12: use e.preventDefault() to prevent automatic navigation
Lines 14-15: We encode the data to content-type x-www-form-urlencoded . This is the same content-type used in the first example. In my experience using URLSearchParams is the cleanest way to do this.
Lines 17-22: We use the fetch function to call the endpoint.
Lines 25: We set the result after receiving the result from the API.
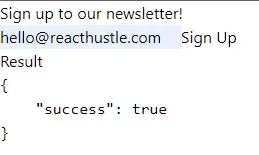
After clicking submit, this is the result:

What's the best approach? #
Both approaches have their pros and cons, and it really depends on the situation. I don't think you should use one exclusively. If allowed, you should probably use the first approach since there's less code. If you need more control, use the second approach.
Full Code #
The full code is available on GitHub: https://github.com/jmarioste/nextjs-submit-form-data-to-api-tutorial
Conclusion #
We learned how to submit and handle form data in NextJS. We used two approaches, one is pure HTML, and one is with react states. Both approaches have their pros and cons, so you should choose one that fits your current needs.
If you like this tutorial, please leave a like or share this article. For future tutorials like this, please subscribe to our newsletter.
Credits: Image by holgerheinze0 from Pixabay


