How to Set Up Mongoose with Typescript in NextJS

Jasser Mark Arioste

Hello, hustlers! In this tutorial, you'll learn how to set up Mongoose (Typegoose) with NextJS. We'll also create a CRUD functionality by creating an API using the /app router. You'll be able to create Mongoose Models using Typescript to have better maintainability in your code.
Introduction #
Mongoose is a great ODM for MongoDB however, when using typescript in your server, you still have to define the Interface and the Mongoose model. Wouldn't defining the interface and model only once would be nice? We can do that by using Typegoose. Using it with NextJS gives you an excellent app in no time.
Prerequisites #
This tutorial assumes you have basic knowledge of NextJS and you already have a MongoDB database up and running. You only have to connect it to NextJS.
Things to Consider #
Deployment. If you deploy in Vercel, you'll have to connect to your database for every route in your Application, whether it's an API route, getServerSideProps, or getStaticProps. Each route will have to initialize the Typgoose models also.
If you deploy your app in Digital Ocean, you'll have to connect to the database only once since it's not a serverless environment. However, you'll also lose the benefits that Vercel provides, so there are tradeoffs to everything.
What is Typegoose? #
Typegoose is an open-source library that lets you define Mongoose models using Typescript classes. In other words, Typegoose is a "wrapper" for easily writing Mongoose models with TypeScript.
There are also some prerequisites that you need to take into account when using Typegoose. You need to have at least the following versions when using Typegoose:
- Typescript - version
^4.9works best - NodeJS - version
^14.17.0(and@types/node@16) - Mongoose - version
~7.1.0
For more information go to the Getting Started guide on the documentation.
Step 1 - Creating a new Project #
Let's start by creating a new NextJS project. You can do so by running the command:
npx create-next-app --ts nextjs-typegoose-starterThe --ts option will install and set up typescript so that we don't have to manually install it. It will also make sure that all files use .ts or .tsx. The CLI will also ask you if you want to install other options like ESLint, Tailwind, alias, etc.
If you want to know more about the options for create-next-app, you can run:
npx create-next-app -h
#or
npx create-next-app --help123
Step 2 - Installing Typegoose #
In this step, we'll install Typegoose and also create a file to connect to our database. First, let's install Typegoose by running the command:
yarn add @typegoose/typegoose mongooseWe also have to install Mongoose since it's a peer-dependency of Typegoose.
Next, let's create the file lib/dbConnect.ts and copy the code below:
// lib/dbConnect.tsx import _mongoose, { connect } from "mongoose"; declare global { var mongoose: { promise: ReturnType<typeof connect> | null; conn: typeof _mongoose | null; }; } const MONGODB_URI = process.env.MONGODB_URI; if (!MONGODB_URI) { throw new Error( "Please define the MONGODB_URI environment variable inside .env.local" ); } /** * Global is used here to maintain a cached connection across hot reloads * in development. This prevents connections from growing exponentially * during API Route usage. */ let cached = global.mongoose; if (!cached) { cached = global.mongoose = { conn: null, promise: null }; } async function dbConnect() { if (cached.conn) { return cached.conn; } if (!cached.promise) { const opts = { bufferCommands: false, }; cached.promise = connect(MONGODB_URI!, opts).then((mongoose) => { return mongoose; }); } try { cached.conn = await cached.promise; } catch (e) { cached.promise = null; throw e; } return cached.conn; } export default dbConnect;1234567891011121314151617181920212223242526272829303132333435363738394041424344454647484950515253545556
This makes sure that we only have to connect to our database when our serverless function cold starts. This approach is taken from the next js example with mongoose.
Step 3 - Creating the Environment Variables #
Next, let's create the .env.local file and add our environment variable.
# modify it to your mongodb connection string
MONGODB_URI="mongodb://127.0.0.1:27017/my_database"1
Step 5 - Creating a Typegoose/Mongoose Model #
Next, let's create a Mongoose model using Typescript classes. For this tutorial, we'll create a Todo model. First, create the file models/Todo.ts:
import { prop } from "@typegoose/typegoose";
import { nanoid } from "nanoid";

export class Todo {
  @prop({ default: () => nanoid(9) })
  _id: string;

  @prop()
  title: string;

  @prop()
  description: string;

  @prop({ default: false })
  completed: boolean;

  @prop({ default: () => new Date() })
  createdAt: Date;
}12345678910111213141516171819
If you have type errors, add the following to your tsconfig.json file:
// tsconfig.json
{
  "compilerOptions": {
    //...
    "strictPropertyInitialization": false,
    "emitDecoratorMetadata": true,
    "experimentalDecorators": true
  }
}123456789
Next, to be able to use this Todo class, we have to create a TodoModel using getModelForClass function from Typegoose. Let's create a file models/index.ts:
// models/index.ts import { Todo } from "@/models/Todo"; import { getModelForClass } from "@typegoose/typegoose"; export const TodoModel = getModelForClass(Todo); // add other models here123456
It's a best practice to initialize all models in one file to resolve circular dependencies or references to other collections.
Step 6 - Creating a REST API #
Next, let's create a rest API to implement CRUD functionality for our Todos.
Create the file, pages/api/todos/index.ts. This is for retrieving the todos list and creating a single Todo.
// pages/api/todos/index.ts import { TodoModel } from "@/models"; import type { NextApiRequest, NextApiResponse } from "next"; import dbConnect from "@/lib/dbConnect"; interface CreateTodoBody { title: string; description: string; } export default async function handler( req: NextApiRequest, res: NextApiResponse ) { await dbConnect(); if (req.method === "GET") { // for retrieving todos list const todos = await TodoModel.find({}).limit(10).lean(); res.status(200).json(todos); } else if (req.method === "POST") { // creating a single todo const body = req.body as CreateTodoBody; const todo = new TodoModel({ title: body.title, description: body.description, }); await todo.save(); res.status(200).json(todo.toJSON()); } else { res.status(405).json({ error: "Method not allowed" }); } }1234567891011121314151617181920212223242526272829303132
For updating and deleting, and retrieving a single Todo, create the file pages/api/todos/[id].ts:
// pages/api/todos/[id].ts import { TodoModel } from "@/models"; import type { NextApiRequest, NextApiResponse } from "next"; import dbConnect from "@/lib/dbConnect"; import { Todo } from "@/models/Todo"; type UpdateTodoBody = Partial<Todo>; export default async function handler( req: NextApiRequest, res: NextApiResponse ) { // first connect to the database await dbConnect(); const id = req.query.id as string; if (req.method === "GET") { // for retrieving a single todo const todo = await TodoModel.findById(id); if (todo) { res.status(200).json(todo); } else { res.status(404); } } else if (req.method === "PUT") { // updating a single todo const body = req.body as UpdateTodoBody; const todo = await TodoModel.findById(id); if (todo) { todo.set({ ...body }); await todo.save(); res.status(200).json(todo.toJSON()); } else { res.status(404); } } else if (req.method === "DELETE") { // deleting a single todo const todo = await TodoModel.findByIdAndRemove(id); if (todo) { res.status(200).json(todo.toJSON()); } else { res.status(404); } } else { res.status(405).json({ error: "Method not allowed" }); } }123456789101112131415161718192021222324252627282930313233343536373839404142434445
Step 8 - Testing and Results #
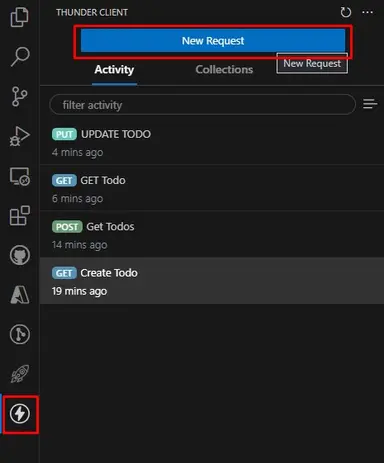
To easily test the API, I use the Thunder Client VScode extension. I recommend you use it too, I find it much easier to use than Postman.
After you install it, you can access it on your sidebar and click "New Request".

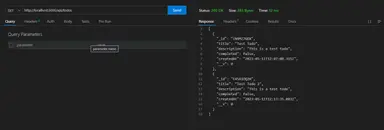
Here are the results:
Create Todo

Retrieve Todos/Todo


Update Todo

That's basically it!
Full Code #
The full code is available on my Github: jmarioste/next-js-typegoose-starter
Conclusion #
You learned how to set up Mongoose with NextJS and Typescript by using the Typegoose library. Typegoose is an excellent wrapper for Mongoose that allows us to easily create APIs and update our database models. Another good step you can take is to add validation by using the class-validator library.
If you like this tutorial, please leave a like or share this article. For future tutorials like this, please subscribe to our newsletter or follow me on GitHub.
Resources #
- Typegoose docs
- Mogoose NextJS example by NextJS - connecting mongoose to nextJS but does not use Typegoose.
Credits: Image by Pfüderi from Pixabay


