Tutorial: Dynamic syntax highlighting in editor.js using prism.js (Next.js app)

Jasser Mark Arioste

In my previous tutorial, we learned on how to set up editor.js in a next.js app. In this tutorial, you'll learn how to dynamically load any supported language on PrismJS inside a NextJS app if you're using EditorJS in your backend/cms.
What is Prism.js? #
If you have a developer blog or use code snippets on your website, you most likely want syntax highlighting when rendering the code blocks. Otherwise, it just looks awful and unreadable.
Prism.js is a very lightweight syntax highlighting package that provides amazing results. It's very light, extensible (with currently 290+ supported programming languages), intuitive, blazing fast, and easy to style.
Or if you are using editor.js in your cms, we know that the code tool plugin doesn't have syntax highlighting built-in. One good package for that syntax highlighting is prism.js
What's the problem with EditorJS code block? #
The problem with EditorJS code input is that it doesn't have a lot of features. It looks like this when editing:

As you can see it's very plain and there's not much we can do.
Is it even possible to provide metadata information here? Is there another code plugin for editors that we can use? Well, there are. but I don't recommend using them since they are pretty buggy. Instead, I'm going to show you a technique I use to format the language metadata so that we can parse it when rendering it in the front end.
This technique is also feasible on other CMS like Strapi, it doesn't matter where your data comes from. You only have to format it and parse the input properly.
Project Setup #
If you haven't set up your editorjs and next.js project, please take a look at this tutorial and we'll continue from there. After you're done with that, let's move on to the next step.
How to input metadata on @editorjs/code tool
#
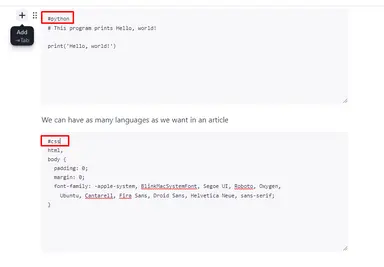
It's very simple. It doesn't only allow us to input code, it allows us to input a string, and we can format that string however we want. In otherwords, we can set the language somewhere in the text box. I'd like to set it at the first line of every code and parse it on the front-end. Here's how I add metadata to editor js input, and it turns from this:

To this:
//index.tsx // this is a piece of tsx code indicated by "tsx" at the first line. import '../styles/globals.css' import type { AppProps } from 'next/app' function MyApp({ Component, pageProps }: AppProps) { return <Component {...pageProps} /> } export default MyApp12345678910
All right! Now that that's done. we know how to set the programming language, but how do we dynamically load the language in prism.js?
Scenario 1: Loading the languages statically #
First we have to know how to load the languages statically. Traditionally, when loading a language from prism.js it is done by knowing in advance the programming languages you use in your website, and loading them statically in a code component for example. See the CodeRenderer component below:
import React, { memo, useEffect, useMemo } from "react"; import Prism from "prismjs"; //start:load the languages you need for your blog here import "prismjs/components/prism-jsx"; import "prismjs/components/prism-tsx"; //end:load the languages you need for your blog here import "prismjs/themes/prism-tomorrow.min.css"; type Props = { code: string; }; const CodeRenderer = ({ code }: Props) => { const [lang, ...body] = code.split("\n"); const language = lang.slice(1); const other = body.join("\n"); useEffect(() => { Prism.highlightAll(); }, [language, code]); return ( <pre> <code className={`language-${language}`}>{other}</code> </pre> ); }; export default memo(CodeRenderer);123456789101112131415161718192021222324252627
The code above would suffice if we only have a few languages and the cost of importing a few languages is not that big. However, what if our site supports multiple programming languages? We don't want to statically load all languages when an article only needs one or two. We have to know what languages are inside a given article and load them only when needed! Let's proceed to the next step for this scenario
Scenario 2: Loading the languages dynamically #
We have to tweak the code above a little bit! Let us make use of next.js import() statement to load libraries dynamically. It's perfect for this use case. See the code below:
import React, { memo, useEffect, useMemo } from "react"; import Prism from "prismjs"; import "prismjs/components/prism-jsx"; import "prismjs/components/prism-tsx"; import "prismjs/themes/prism-tomorrow.min.css"; type Props = { code: string; }; const CodeRenderer = ({ code }: Props) => { //first we split the lines, the first line will be reserved for the language definition. //the next lines will be reserved for the code itself. const [lang, ...body] = code.split("\n"); //get the language const language = lang.slice(1); //join the body const _body = body.join("\n"); useEffect(() => { //create an async function to load the lanugages using import async function highlight() { if (typeof window !== "undefined" || !language) { //import the language dynamically using import statement await import(`prismjs/components/prism-${language}`); Prism.highlightAll(); } } highlight(); }, [language, code]); return ( <pre> <code className={`language-${language}`}>{_body}</code> </pre> ); }; export default memo(CodeRenderer);123456789101112131415161718192021222324252627282930313233343536373839
There we have it once we import the language, we call Prism.highlightAll() to highlight the code.
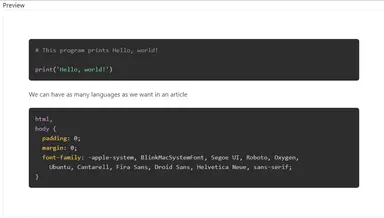
Let's take a look at the results. Below are examples of what we input in the CMS. You can access the demo here: DEMO:Dynamic Syntax Highlight in PrismJS
Sample code

Preview

Let's check the network tab if the languages are dynamically loaded. Yep, it's there.

Bonus: Using the CodeRenderer component in editorjs-html configuration
#
Using the code renderer is very simple. In our editorJsHtml config, we just replace the default output with our own react component:
//EditorJsRenderer.tsx import { OutputBlockData, OutputData } from "@editorjs/editorjs"; import React from "react"; import CodeRenderer from "./CodeRenderer"; const editorJsHtml = require("editorjs-html"); const EditorJsToHtml = editorJsHtml({ //replace the default code renderer with our custom code renderer code: (block: OutputBlockData<string>) => { return <CodeRenderer code={block.data.code} />; }, }); type Props = { data: OutputData; }; type ParsedContent = string | JSX.Element; const EditorJsRenderer = ({ data }: Props) => { const html = EditorJsToHtml.parse(data) as ParsedContent[]; return ( <div className="prose max-w-full "> {html.map((item, index) => { if (typeof item === "string") { return ( <div dangerouslySetInnerHTML={{ __html: item }} key={index}></div> ); } return item; })} </div> ); }; export default EditorJsRenderer;12345678910111213141516171819202122232425262728293031323334353637
Bonus: Caveat of using dynamic import #
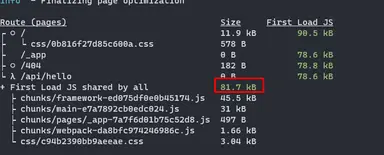
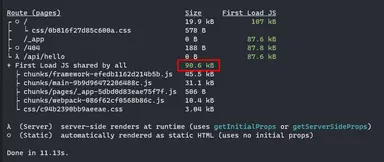
One caveat of using dynamic import for importing libraries in next.js is that it adds 10kb to the default bundle size. Keep this in mind because if you are using less than 8 languages, the bundle size is lower. Remember to only use dynamic import for more than 8 programming languages:
Build result Without dynamic import (2 languages):

Build result WITH dynamic import (0 languages):

Conclusion #
We've overcome many obstacles in setting up syntax highlighting in a next.js project using prism.js as the syntax highlighting library. We learned on how to set the language on the default code plugin in editor.js. We learned how to parse the input and render it with syntax highlighting. We learned static and dynamic importing of the languages, and we also learned the caveats of dynamic importing. We can use either technique depending on the situation and even combine both dynamic and static at the same time.
Resources: #
Full code is available here: https://github.com/jmarioste/editorjs-next-syntaxhighlight
Demo is available here: https://editorjs-next-syntaxhighlight.vercel.app/
Credits: Image by 🌼Christel🌼 from Pixabay


